 |
January 25, 2019
Last week I did a blog here and on my online blog about Why Sew? The point was to more clarify what really draws me to sewing, which is the ability to express my individual style and to a large degree be individual and unique without orbiting Mars, aka looking nuts or unhinged!
Within the discussions on my Facebook post, the replies evolved (as replies are want to do), into a discussion on a patchwork shirt that was created for a TV series on right now. This evolved into discussion on another reason to sew, which is yes, to look individual, but to tailor that individuality into a work of art.
To further clarify, a garment as a work of art, is most often know among sewists as Art-to-Wear. And that sort of garment is almost always baggy, ill-fitting and truth be know, has little or no fitting to it, as it's meant to fit a ton of people, so to retail the garment or the pattern, it's a box which would fit.....well....a box!
But humans are neither boxy nor should we search for clothes like that. We can all be fit, and still have artistic clothing. This brought up the Brianna Shirt (for lack of a better name - read my latest post - link below on more description of this beautiful work of art).
 
But my life has changed and I've moved on from going to 4 or 5 balls every year and into a more casual lifestyle where knits are my go-to-fabrics. I'm not the only one as for many of my clients these days, I'm designing stretch garments. This is all the rage with high-end designers from Carolina Herrera to Alexander McQueen. Mostly because the older consumer is so much more comfy in stretch, while the younger consumer has been working out in her stretch yoga
pants or leggings and then told she has to wear non-stretch pants, and has rejected that in favor of stretch wovens, stable knits and even less casual versions of yoga pants. But that doesn't mean you can't bead these beautiful gowns and ornament them the way you would a woven.
 
These are for ladies who are more mature, there is not one gal who appreciates a gorgeous gown more than a more mature gal, but doesn't have to fiddle, hike, rearrange or otherwise mess with the garment the she time they is wearing it. It's comfy, it moves with her, and it fits, but not like a glove.
But simply because I've moved on doesn't mean I want to look sloppy or as Karl Lagerfeld says:

The very idea of a casual ornamented garment is very exciting.
Hence the patchwork shirt:

In my blog about this shirt, I talk about it's not necessary or even recommended to copy the shirt exactly but to use it for inspiration. Taking bits of scraps or other used pieces of garment and using the basic technique of this shirt, can inspire us rather than imitate to make our own version of this shirt. This is what the blog was about - inspiration more than imitation.
I explained in the blog a little about using ornamentation in a way that can be elegant but doesn't have to be formal. And I also go through some of the solutions that the above design offers that can inspire us to create this on our own.
But I didn't talk about specifics, and thought I would do that here for you all to ponder - and hopefully you will use these techniques in making your own version or something else for yourself. There are some rules and guidelines here that are worthy of note:
- Simply because this isn't Cinderella ball formal, does not mean that you don't have to obey the regular rules of style, fit, proportion and drape. As a matter of fact, if you don't use these guidelines, you can end up in serious trouble. Because we want this to be artistic, not shambles or junky.
- Be specific and edit well on the use of the patches. If you notice carefully, prints and designs are used over and over so that there is a method, albeit chaos-looking, to the number of prints and fabrics used - IOW, don't use more than about 7 to 9 prints to start with. More than that can get to be TMI and junky.
- Try to stay within a certain color palette. If you have troubles figuring out what this is, Adobe Kuler has a nice palette maker with some of the more standard color combinations: Analogous, Monochromatic, Triad, Complementary, Compound, and Shades. I like complementary - I'm a classic gal, what can I say! So choose a color you like - purple?....then
take a yellow ocher to complement it, a pale lemon sherbet, a blue-ish purple, with a spot of something as a focal point like a crimson or cherry red. These should also be in your embroidery thread colors. Also keep in mind that you want to stay pretty close to the same intensities and values in your colors. It's OK to mix a little deep intensities and/or a few high values, but don't let the intensity and value clash in your color choices. Here's a great primer on color if you need that to help you.
- This will go a long way toward getting you started on your colors.
- Keep the prints small, maybe one big one, but don't make them so large that a.) you can't tell what the print is and b.) it overshadows everything else. I'm thinking some of those fantastic Moda prints are a gas to use here. Maybe some from a jelly roll that are already "matched".

- Most important, keep your base style, shirt, dress, tunic, very classic and styled to your shape - apple, rectangular, pear, hourglass. This does NOT mean it's to be skin tight. It does however mean that it has to shape to your body and fit - with ease, to look right. Notice how the style they used in the photos is very fitted to the actress.
- This is loaded with handwork. That means a.) you will never find this in a store - the store that might carry it can't make the price points work. Comparing this to Alabama Chanin's pieces this would most likely retail for $2,000 or thereabouts, and no casual store would be able to sell anything like this. THIS is what makes this unique. You can do the hand work in front of the TV or
even sitting around with friends. It's the hand work that is going to add and extraordinary value to this garment.
- Be really creative and lt your imagination go loose when you're thinking of the hand embroidery stitches. Use the model for ideas on this.
 In the costume version, the actress was going to wear a jacket with it when on screen. That meant that not much around the collar and on top would show, so that meant that not much was there. For us, we're going to show this part off much more. Keep most of the
patches and interest around the collar and face area. In the costume version, the actress was going to wear a jacket with it when on screen. That meant that not much around the collar and on top would show, so that meant that not much was there. For us, we're going to show this part off much more. Keep most of the
patches and interest around the collar and face area.
Now for some direct ideas on how to do this:
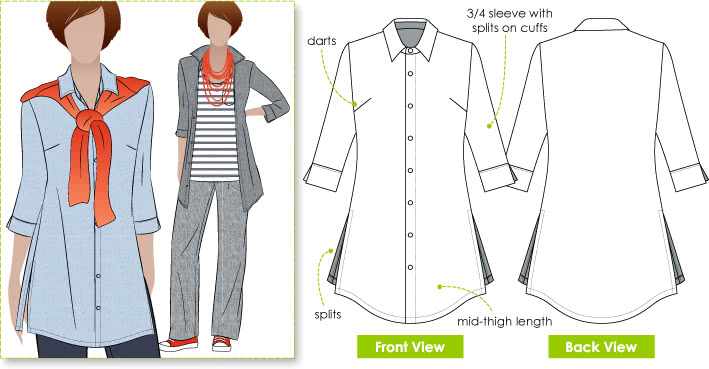 Use a good tailored shirt pattern, with a collar and collar band. This one is a Stylearc downloadable (click on the picture for more info and to purchase). That's going to show off the patching beautifully. You
don't have to use a lot of patches on some of the smaller detailed (collar, collar band) areas, but I wouldn't leave them blank either. About the only alteration I would make to this is to gather the sleeve slightly at the shoulder. The actual blouse style that they use in the show is an 18th century style that is off-the-shoulder, which doesn't look good on most of us. Also this has a nice tapered body, which they did in the show by adding a belt, which you might
like to do too - if it fits your shape and style. Use a good tailored shirt pattern, with a collar and collar band. This one is a Stylearc downloadable (click on the picture for more info and to purchase). That's going to show off the patching beautifully. You
don't have to use a lot of patches on some of the smaller detailed (collar, collar band) areas, but I wouldn't leave them blank either. About the only alteration I would make to this is to gather the sleeve slightly at the shoulder. The actual blouse style that they use in the show is an 18th century style that is off-the-shoulder, which doesn't look good on most of us. Also this has a nice tapered body, which they did in the show by adding a belt, which you might
like to do too - if it fits your shape and style. - When you do put the patches on the collar and collar bands, do them before you sew them up, that way there won't be a lot of frayed edges on them. Although this is a more rustic look, I'm getting away from frayed edges and especially that close to the face. As I said before, you don't have to do them all over the collar and collar band area because it will make it too thick to handle.
- Use a basic fabric for the shirt - a light-weight linen, a medium/light-weight cotton, something like that. Don't use a draping fabric that is too soft to hold up to the patching and stitches that you'll be using.
- Have fun with the buttons. Something interesting to do is get some vintage buttons on the same size and general color but all different and use them. Remember this is supposed to look as though it's vintage and was used by your great-great-great grandmother or something! That's the look we're after - lots of patina!
- I would machine baste the patches on, then get out your embroidery thread and basting the patches first, will allow you to keep everything in place while you're embroidering.
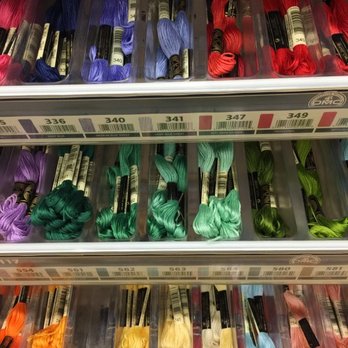 On embroidering, if you are familiar with couching on your machine, that would be a great technique to use. Most embroidery thread you would be using here would be a thicker variety like DMC Cotton Embroidery Floss - use a couple of strands and a needlepoint needle. You want the embroidery to show
up, and also look hand-done which would be a thicker yarn than thread. More the thickness of a pearl type yarn. You can get these at any hobby shop and the big-box fabric/craft stores. On embroidering, if you are familiar with couching on your machine, that would be a great technique to use. Most embroidery thread you would be using here would be a thicker variety like DMC Cotton Embroidery Floss - use a couple of strands and a needlepoint needle. You want the embroidery to show
up, and also look hand-done which would be a thicker yarn than thread. More the thickness of a pearl type yarn. You can get these at any hobby shop and the big-box fabric/craft stores.  Also you can use some embroidery edge and hem finishes. This will add that much more to the look especially in areas where you can't have a lot of bulk to put a patch there. Here are some embroidery stitch ideas that are fun to use. Also you can use some embroidery edge and hem finishes. This will add that much more to the look especially in areas where you can't have a lot of bulk to put a patch there. Here are some embroidery stitch ideas that are fun to use.
Do as much as you want - don't make this a gargantuan project at first, unless you want to. The big rule above all else to remember is that because your patches are going to be so care-free and very Bohemian, to keep this from looking like a mess or junk piece, make your application and sewing techniques as neat and exact as possible. Excellent execution makes the message of the garment more easily understood and more elegant.
OK - now you are armed with some great ideas, great inspiration and winter is the perfect time to do some handwork. So I'd love to see what you all come up with. A little or a lot of patches on your shirt - send them to me and I'll post them up here in a couple of months.
****************************
So I wrote this on Monday of this week, and Tuesday I get my new BurdaStyle magazine and guess what - they have a GREAT blouse pattern to use. It requires a few tweaks, but it's a great pattern. I like BurdaStyle because they have a more natural cut. That means they are for a more realistic figure that some string bean model. The pattern has all the bells and whistles I like (collar,
collar band, cuff) however you will need to add an FBA - even if you don't think you need one. You add the FBA so that you can have that wonderful clean side silhouette, and even if you don'g have a large bust or large differential from waist to bust, it does wonders for your figure. Part of what makes this shirt so cool is the silhouette. This is the basis you will do all your art work on. So you have a choice here - do it on a box that will
make you look like a box, or with a couple of hours extra attention you spend the many hours of the patchwork on a silhouette that looks good on you - you end up with a totally cool project that shows off your artistic skill in many ways: 1.) the beautiful hand work of apply the patches, 2.) the artistic choice of the patches, 3.) the artistic choice of location and arrangement (and don't fool yourself, this is called layout work and ad agencies charge a mint for this service,) and 4.)
the beautiful silhouette of the shirt on your body. Not many may or will recognize the later but it will show when it's not there.
OK - the pattern is a download, but as of this writing, BurdaStyle hasn't posted up the pattern yet. You can go to BurdaStyle.com and do a search for 02/2019 #102 and the blouse should pop up. I can't include the link here cause it's not up yet, but will be - maybe not till February1st.
So in the discussion on my Facebook Profile about the last blog about Why Sew?, there was a mention of another outfit I’ve been oodling over…Brianna Randall Fraser’s Patchwork Shirt. So who in the world is Brianna Randall? As some of you may know I’m a huge Outlander […]
Read more →
This morning I’m doing something a little different. I also write a weekly outreach that is geared toward a sewing-minded audience, whereas the blog is more general. IOW, the blog is geared for those who might not necessarily sew but are interested in it. But this morning, […]
Read more →
Nothing like starting out the new year with something that I love to do, which is designing and making a gown that is: custom fit flattering fit (and those are two different things) comfortable beautiful But that may not include looking good on the hanger. As a matter […]
Read more →
Wow! What a wonderful year. Sometimes it’s the year of the formals, sometimes the year of the brides, sometimes the year of the debs – it all depends. This year was mostly brides, but some other things and most of all a lot of fun!!! The year […]
Read more →

PS - I do a lot of posting on Facebook as both Claire Kennedy and SewingArtistry - if you want to friend me to check out the goodies over there for free!
To view this email in browser or to see past emails click here.
|
|
Follow Us!
    
|
|


