 |
May 7, 2021
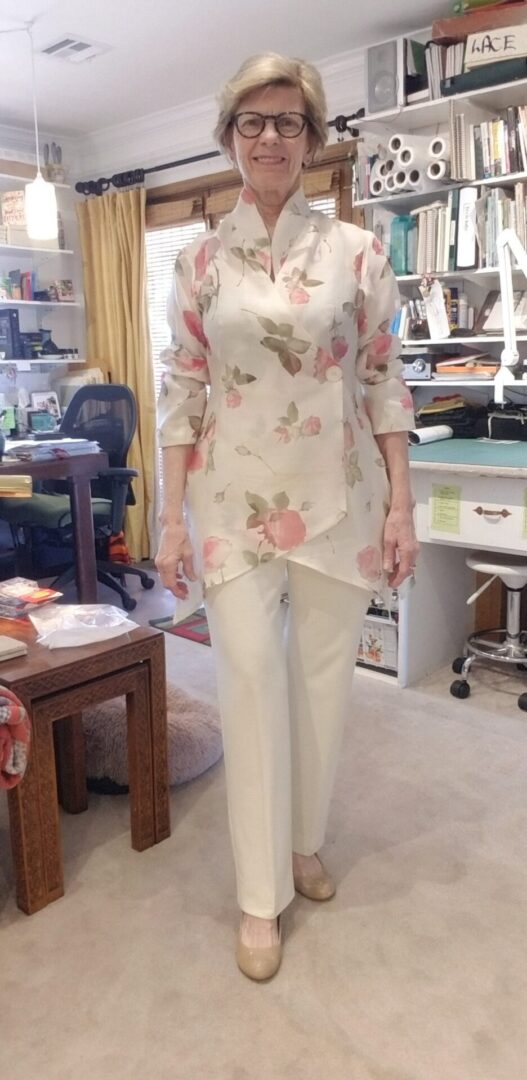
Several people have asked about the shirt I wore for my beautiful flowered pants. This has been a really fun shirt to wear.
It all started with a couple of Pinterest photos:
I fell in love with this and worked out a great pattern to do this.
This is a great way to alter your core pattern for more variations for your core pattern. Essentially what you are doing is copying parts from other patterns onto your core pattern, and that's what happened here. This insures that I'm going to get a comfortable, flattering fit every time, cause my base is always my core pattern.

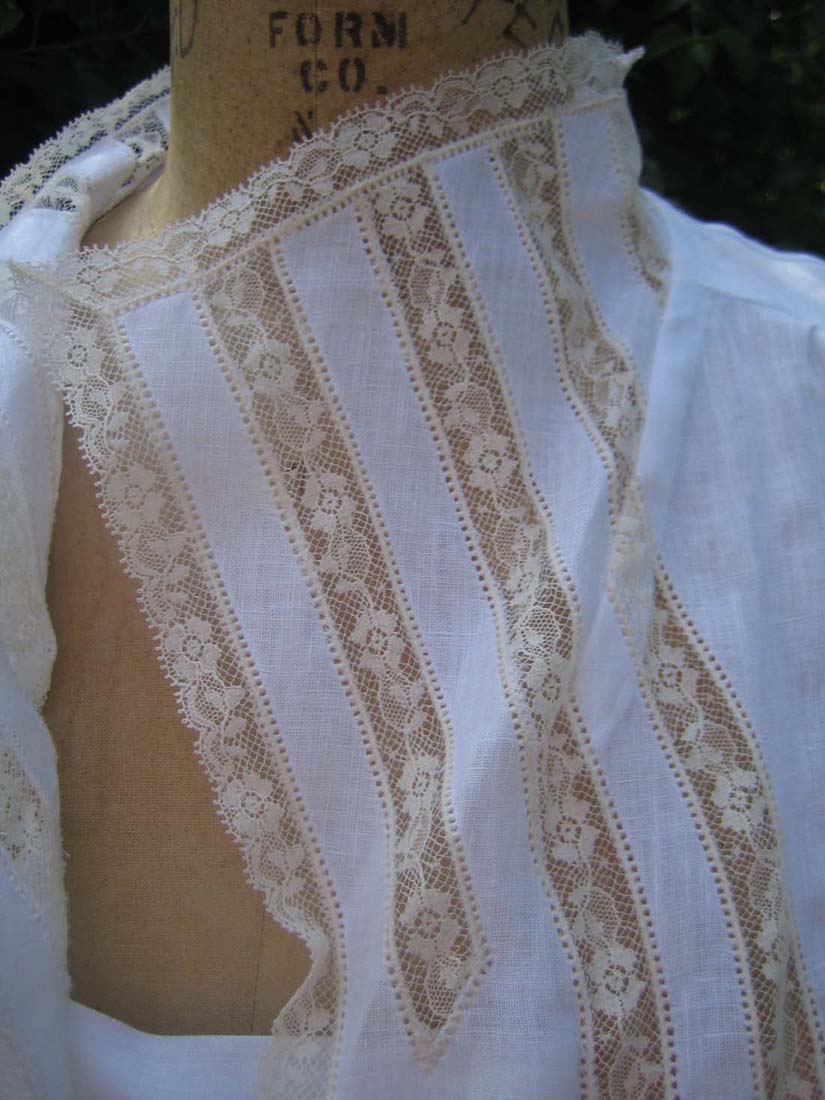
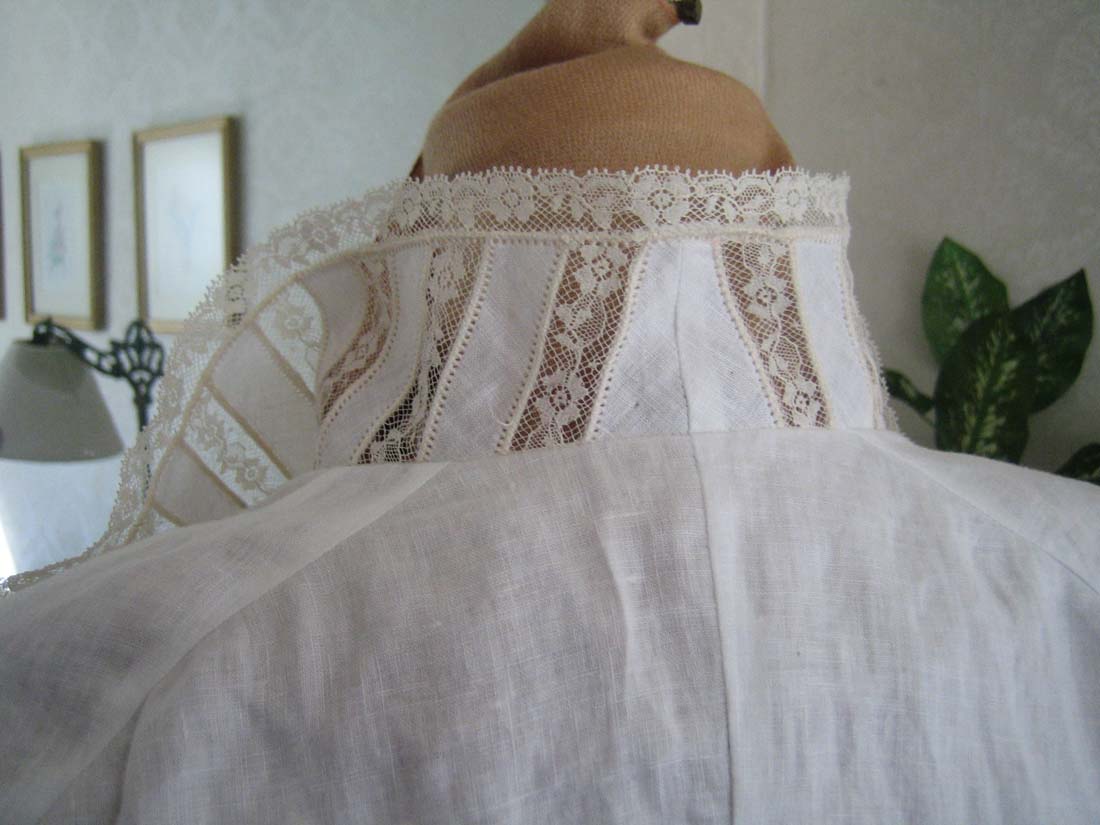
That didn't mean I wasn't going to have some problems come up and the first one is that the front and back of the collar had to have a finished look. At the same time I had to have support for the back of the collar because it's the framed style of the collar that I love so much. This meant a soft roll in front and a stand up in back -
a la Sleeping Beauty Maleficent fame.
And the biggest issue of all was getting the heirloom lace insertions in at the right place. Although in the example that inspired me, this collar rolls over all the way around. I didn't want that. That meant that I was going to have to match the lace insertion but still have the fit and roll that I wanted.
Basically this looked like a nightmare in matching, measuring and execution. Then I had an idea.
What would happen if I laid out the heirloom insertions exactly the way I wanted, machine basted them in place, then cut the fabric out and finished the insertions with a close zigzag stitch over the edge of the insertions? Hmmm! And if I wanted I could use the wing needle to make the delicate entredeux edging look.
Entredeux is that delicate edging on the lace insertion, not the insertions itself.
 
And believe it or not, this is not that hard to do with a machine. But I had another problem.
The only fabric I could get my hands on was a beautifully light-weight pima cotton. By it's very nature it's very thin, very light-weight and very delicate. The blouse is currently about 3 years old and it's perfect for these hot summer days in the Southern Plains, but it is delicate, and not nearly as strong as a handkerchief linen, which is preferable for this sort of delicate work. Working with a wing needle to accomplish this entredeux look would be
courting disaster. The fibers and fabric was so delicate that the entredeux look would have most likely damaged the edges to the point that any attempt at basting or zigzagging the edges might have resulted in a real ragged, unfinish and very unprofessional look. So I decided not to do the delicate entredeux look in favor of a more secure and less straining entredeux stitching.
That doesn't mean I don't recommend it, but it does take a very strong stable fiber to do this and linen is perfect for this. I simply couldn't get my hands on some at the time.
So back to the design.
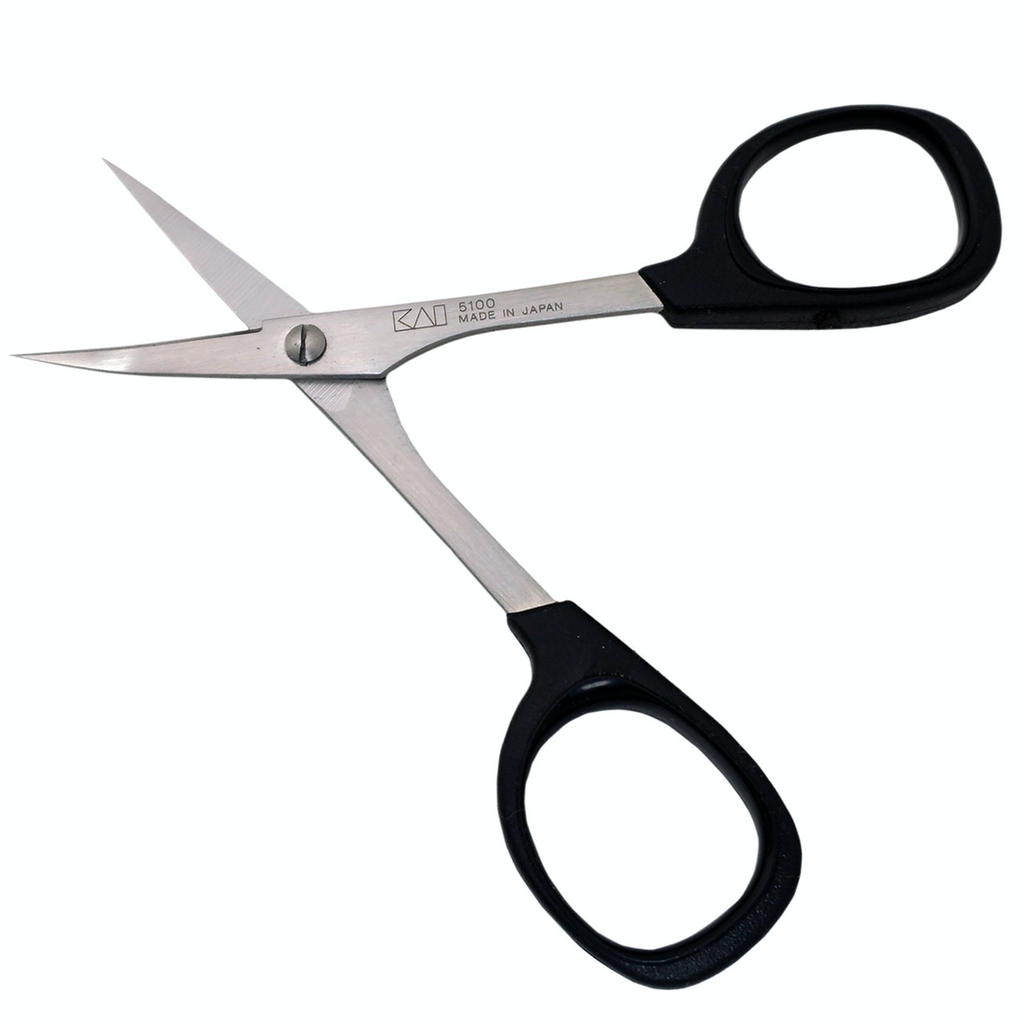
Having laid the insertions out the way I like, I machine basted them in place and then with those wonderfully sharp little Kai Scissors (and gang, if you have delicate work like this, these scissors are perfect. Click the photo for more info), I proceeded to clip away at the pima cotton behind the lace insertions.
This wasn't as painstaking as I had originally made it out to be in my head and really it went very quickly. After that, I put on my edge stitch foot with the stitch-stabilizer and boom, I worked right through the tiny zigzag for my finished look.
 

This gave me everything I wanted in this look. From a style point of view, I probably would have liked this collar a little larger, but the weight of the fabric and the interfacing (I used silk organza - two thicknesses) would have precluded the nice roll I get on this collar.
For the edging I had some wonderful baby-weight heirloom edging that I had been dying to use, and this was perfect.
The lace insertion was the hardest part of this whole top because I was using my core pattern base, I knew the rest was going to work fine and didn't have to worry about fit or style or flattering my figure, because all that work had already been done. So once I got the insertion done, the rest was easy.
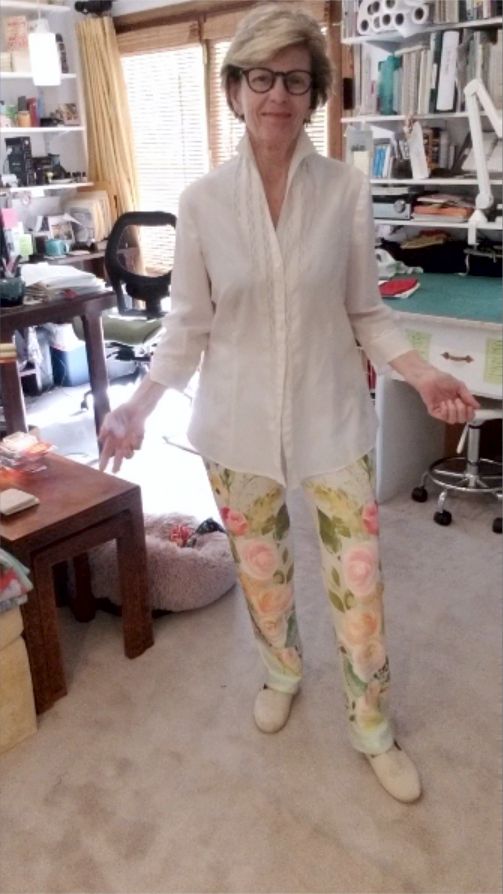
And with my new floral pants, this makes the perfect top. Although the lace insertions are translucent, they aren't quite revealing enough to show too much. If I feel that way, I can always wear one of my skin-toned tops to hide my bra and cover the subject!
The whole idea here is to make the look I wanted and make it as easy as possible. The technique of laying it on the fabric to start, basting and then cutting out the fabric may not be revolutionary, although I haven't seen it any place else, and it's also not the classic way to do this (which is to cut the pattern with the insertions being done after the fabric has been cut), this is a method that was time-efficient and worked well for the look I wanted.
So this is my permission to you, to use shortcuts (aka time-efficient techniques and methods), and your imagination to fulfill your fondest dreams into realization. That may not be methods that have been used in the past. That may be something original for you. That's OK. Yes, there are basic guidelines and rules to make your sewing excellent. But there is nothing that says if you find a better way or think of another way, that it's incorrect or not to
be done to accomplish your look.
I see this most often in my cosplay classes where they are creating fantastical costumes and looks that are simply so creative and imaginative, that there is rarely any technique in the classroom or text books that would cover the look they are trying to accomplish. I've also been presented with designs from my clients that make for gorgeous looks that aren't covered by those same classes or textbooks.
But then that's why they call we sewists artists. We are always creating new ways and new looks and new techniques!
 Welcome to the world of a great fitting, flattering and comfortable pant. Yes, it's possible and no it doesn't take a Ph.D. from FIT!!!! Once you have this pattern perfected, making pants up is a cinch. It takes an afternoon for a newbie, but for a pro, a couple of hours -- once you have that pattern perfected.
This is the pant that I wear that gets the most compliments and even pros in the business remark at how well it fits because the hang and drape is so good. What they don't know that I do, is that this pant has the "Aaaaahhhh" factor. When I sit down I'm never worried about whether the pant will split or I'm going to have my eyeballs pop out cause the pants are so tight!
And that's what this resource does. Included in the resource are:
- Instructions on the kind of fabric to use and why
- Instruction on the pattern to use and why
- Instruction on fit, hang, the drape of the pant
- Instruction on hems and hem styles
- and when to use what style where
- Instruction on finishing techniques
- Instruction on variations of this ponte pant
- Instruction on styling for different figure types
- Instructions for care
This is full of inspiration, and instruction and is one of my most popular classes at Bernina when I teach in person - hopefully we will do that again!!!
In the meantime here's a fun class at the usually special discount for new resource introduction.
On the Blog
|
|
|
Good fashion can take me away for hours even before I realize what's happened. A simple search, or worse a ...
|
|
|
From the first time I stepped into the Victoria and Albert Museum in London, I was a goner. The place ...
|
|
|
|
A subscriber to my weekly email asked (WHAT?...you don't subscribe? ...goodness, it's free and lots of info over there - ...
|
 PS - I do a lot of posting on Facebook as SewingArtistry - like my page to see more goodies!
To view this email in browser or to see past emails click here. (This still works, and will work)
We respect your email privacy
|
|
|
|


