|
August 28, 2020
So for my final core pattern redeux, this has gotten to be an addiction as I've forgotten how much fun it can be.
I finally finished my traditional Thomas Pink shirt. These were designed so that
So yes the sleeves are a little long, but this doesn't bother me cause I hardly every wear sleeves buttoned and long. HOWEVER, the traditional Thomas Pink (an English bespoke shirtmaking firm), makes their shirt like this.
- basic fabric upper shirt cuffs
- basic fabric shirt upper shirt collar
- basic front fabric front upper placket
This is so that when the shirt is worn in a business setting with tie (covering the collar band), cuffs buttoned and under a jacket, so the shirt looks like a classic pin-striped shirt.

But in the evening or at a more casual setting, the shirt is un buttoned and the cuffs are turned up (from the slang saying of pushing your cuffs up which mean to labor) and suddenly the shirt comes to life because:
- Contrast upper collar band
- Contrast under collar
- Contrast under collar band
- Contrast under front placket
- Contrast upper sleeve placket
- Contrast under sleeve placket
- Contrast placket to be folded over by upper placket
- Contrast under cuff
With all that going on, it's almost as if the wearer is the only one who knows what cool things are hidden in the traditional business shirt.
I absolutely love this sort of illusion that is almost for the benefit of the wearer alone - or at the most, a close friend or two. This is so much fun to play out and quilt fabric shops are a great place for this.
On planning this, it isn't all that hard, but becomes easier with some practice.
 There are actually four fabrics here -
Basic classic stripe. This stripe is so fine that it's hardly visible at a distance, and this is what makes it even more fun. It's only when you're up close that you see it's actually a stripe
Contrast 1. This is an overall design, and has more contrasting color and less background
Contrast 2. This is same coloring as Contrast 1 fabric, but more background (cream in this case)
Contrast 3. A completely different coloring. This one tones with the classic stripe, but strong enough that I didn't need much, just a little "pop".
When I was looking at buttons in my stash, I found these really cool buttons but only had 5 of them. Poo. But never fear, cause there are always some great alternatives.
First, with "show" buttons like this, it's really hard to do something at the top of the placket. As a matter of fact I really don't like too decorative of a button on the collar band at the top because it makes it hell to button. So to do a nondescript basic button is a great solution to the top of this. And there's nothing more basic than a nice pearl button. I used a
smaller version for the top of the front placket, but a larger version on the sleeves. The truth is that this button will hardly show. It's simply a finishing detail.
There are actually four fabrics here -
Basic classic stripe. This stripe is so fine that it's hardly visible at a distance, and this is what makes it even more fun. It's only when you're up close that you see it's actually a stripe
Contrast 1. This is an overall design, and has more contrasting color and less background
Contrast 2. This is same coloring as Contrast 1 fabric, but more background (cream in this case)
Contrast 3. A completely different coloring. This one tones with the classic stripe, but strong enough that I didn't need much, just a little "pop".
When I was looking at buttons in my stash, I found these really cool buttons but only had 5 of them. Poo. But never fear, cause there are always some great alternatives.
First, with "show" buttons like this, it's really hard to do something at the top of the placket. As a matter of fact I really don't like too decorative of a button on the collar band at the top because it makes it hell to button. So to do a nondescript basic button is a great solution to the top of this. And there's nothing more basic than a nice pearl button. I used a
smaller version for the top of the front placket, but a larger version on the sleeves. The truth is that this button will hardly show. It's simply a finishing detail.
 There's something I love to do with my shirts like this. As we get older, we really don't need all that fabric on our arms, as well as being in the way most of the time. At the same time I love having the contrasting sleeve placket (and it's variations are so much fun to play with). So how do I roll up my sleeves but still show off all this detail and work.
Enter the rubber band:
There's something I love to do with my shirts like this. As we get older, we really don't need all that fabric on our arms, as well as being in the way most of the time. At the same time I love having the contrasting sleeve placket (and it's variations are so much fun to play with). So how do I roll up my sleeves but still show off all this detail and work.
Enter the rubber band:

 Placing this a little close to the top (or even above) the sleeve placket, and then pushing up the sleeve so the rubber band hits above the elbow. Then simply pull some of the extra sleeve fabric over the rubber band, and voilá! You have a stable and secure pushed-up sleeve look, without rolling those gorgeous cuffs and particularly those beautiful sleeve plackets.
Another benefit here is that the placket acts as a great vent so that when you bend your elbow, the placket will give you great ease so that the elbow can move without any restriction.
Hopefully you have a woven as well as knit core pattern top, because there are times when you need both.
In the Core Pattern Resource, I'm using a woven pattern as inspiration for a knit top. The reasoning on this is fairly simple when you think about it, but this is the advantage of having both knit and woven core patterns.
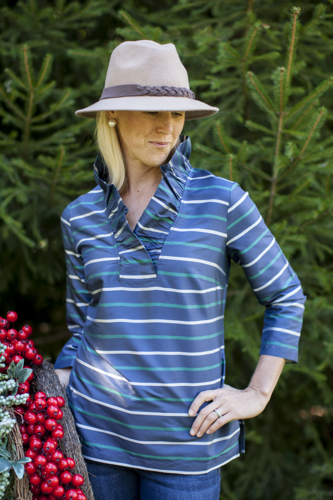
The inspiration for this neckline was from a woven top:
Placing this a little close to the top (or even above) the sleeve placket, and then pushing up the sleeve so the rubber band hits above the elbow. Then simply pull some of the extra sleeve fabric over the rubber band, and voilá! You have a stable and secure pushed-up sleeve look, without rolling those gorgeous cuffs and particularly those beautiful sleeve plackets.
Another benefit here is that the placket acts as a great vent so that when you bend your elbow, the placket will give you great ease so that the elbow can move without any restriction.
Hopefully you have a woven as well as knit core pattern top, because there are times when you need both.
In the Core Pattern Resource, I'm using a woven pattern as inspiration for a knit top. The reasoning on this is fairly simple when you think about it, but this is the advantage of having both knit and woven core patterns.
The inspiration for this neckline was from a woven top:
  The problem really doesn't show up here till you start thinking about things like shaping this and suddenly it occurs to you: If I have all these fitting darts and shaped to my waist (even if it isn't tiny), then how is it going to fit over my shoulders or above my hips, and the truth is that there's a huge problem with this design that you don't get till you start thinking closely about
this.
So you start thinking about closures:
The problem really doesn't show up here till you start thinking about things like shaping this and suddenly it occurs to you: If I have all these fitting darts and shaped to my waist (even if it isn't tiny), then how is it going to fit over my shoulders or above my hips, and the truth is that there's a huge problem with this design that you don't get till you start thinking closely about
this.
So you start thinking about closures:
- Zip up the back: this is great, but how are going to close that ruffle in back?...leave the ruffle part open?...zip up the ruffle?...how will that affect the lay, weight and fold of the collar in back? IOW if you want the ruffle to stand up, will it with the weight of the zipper?... Will it stand up on it's own without the zipper? When you start going through about 4 or 5 solutions, the
whole idea gets a little tricky.
- Close in front: Do you put in a zipper in front, below the bottom of the ruffle?...an invisible zipper?...then how does that affect the look of the bottom of the front?...will it hang correctly?...will the weight of the zipper affect the look?...will a closure there be practical to put in?...will a closer affect the clean look of the front (so that the focus can be on the ruffle and the neckline)?
Again a lot of things to consider.
- Different type of closer than zipper: Buttons?...snaps?....hooks? All of these will take away from the clean look in front, and in back the hooks might work, however how are you going to hook those up by yourself?...you'd probably need help.
- Close on the side: This is to allow fullness and avoids the problem of the back ruffle zipper/closure and the front bottom zipper/closure. But again, how does this affect the look, because it is in the side seam and sill make the side seam thicker which is not a place anyone wants thicker, no matter how thin you are.
Looking back at the model for more clarification:
You can begin to see the problem once you look closer. The bodice here is straight. There is a side bust dart, which helps, but the bodice is actually straight.
Also the more you look at this design, the way it really works is when there is more fit through the waist than if it were straight. If the top has no shape, then it's a box with a ruffle on top and the whole top loses its appeal and finesse.
But......what happens when you make this out of knit?
Suddenly it works. Why? Because of the stretch of the bodice, you can snug it in a little in the midriff (below the bust and above the waist) area and it has movement; it has line; it has shape; and it has the ruffle!
But the ruffle isn't really in stretch since it's been interfaced with a woven fabric, it's stable. And because the neck is wide enough to get your head through it (it can only go on one way now, over the head), it's fine as far as any other closures need.
This is the advantage of having both a knit and woven core pattern. And you can take any knit and make it act like a woven, but you can't do the other way around. So for this ruffle top now the bodice is comfy and stretches, while the ruffle is stable and stands up like a pro!
So as an additional treat, one of my students does a lot of fabric dyeing and is having a workshop September 12 from 10am to 2pm. She's very gifted and we are really lucky to have someone so creative and artistic in the area teach her great skills
These sorts of fabrics can be absolutely gorgeous in core patterns. Using a core pattern means you can spend more time plotting out how to cut and design the fabric for the garment. Here's more information about her classes, and check out her gallery for more ideas.
July's August's Feature Resource
Well, sometimes I outsmart myself, and a very kind subscriber pointed out that there was no link to the Core Patterns, so I'm going to keep this up for another month, with the special price, for those of you who tried to click something that wasn't there!

Core Patterns are a great way to get to simplifying not only your sewing but also the selection process that you go through in selecting projects.
I personally keep a list of visual ideas on Pinterest (which is so perfect for this) so that when I'm perusing the net, I simply add photos or pictures to my Pinterest page, and make a little note like "Neckline," "Lapel," "Scarf," and on like that to draw my attention to that part that I like. Sometimes it's color or color combinations, sometimes it's a simple way that a collar rolls. Sometimes it's the whole dang thing.
Then when I get those, "I need a new red top," or "I don't have a good red top to go with all the red bottoms I have," or any other harebrained idea, I can simply check out my Pinterest page of ideas and boom I'm off and running.
Then there's finding the pattern, or even worse having to draft the whole thing up from scratch. But lately I've been turning more and more to my core patterns and with a little manipulation of those patterns, I have a pattern that fits, that's flattering, that's comfy and that is fairly time-efficient to make up.
These are all from my core knit pattern.

Now how do you pick out a core pattern? What makes a good core pattern? What are some ideas for variations? How do you avoid pitfalls in fabric selections for blocks or different sections on a core pattern?
And this resource also includes another bonus - how to better choose fabrics for your patterns and how to better purchase online fabrics that will work with your projects.
As usual this resource is 15% for the month of August - click here to see more..
PS - I do a lot of posting on Facebook as SewingArtistry - like my page to see more goodies!
To view this email in browser or to see past emails click here. (This works now and is a lot of fun to check out!)
We respect your email privacy
|
|
|
|