Fun Things To Do W/Pattern DesignJune 12, 2026
So one of the readers
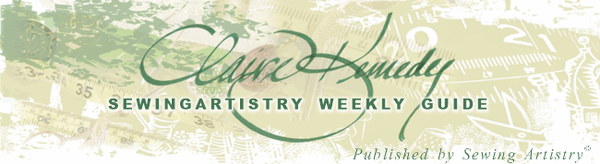
sent me a fascinating picture from an article she had read. (Thank you, Anne) So I set about figuring out what's going on with the pattern that made it so successful, and with the knock-off she did, which seemed a bit off.
This is
all part of the creative process, and being able to take apart a design and construct a version for yourself is probably one of the most powerful and satisfying things we do.
Whether is a glorious glam dress for an upcoming formal occasion.....
...or it's a simple garment that works day in and day out with a lot of style and panache.
...to something you can get a lot of use out of.
The point is taking apart a good design and refitting and making it your own, is incredibly empowering.
But this requires some thinking - like how to make it flatter you, make it
your look, not some designer's or TV costumer's look, and above all make the whole design work.
So let's take this design apart and figure out what's so neat about it, and how we can make that cool look for ourselves. A Design Anatomy This is an interesting design, and the first thing to notice is that this gal has not got an ounce of extra weight on her. So, pretty much she's
fitting bone and skin, and that's it. This is what runway designers do that makes their clothes easier to fit than fitting the four parts of a regular body (muscle, bone, skin, and fat). Removing 2 of the variables makes fitting much easier. That's a fact.
Now, not all of us are bone and skin. Frankly, that's a very boring life, so we regular people are going to have to fit those other two variables. I usually knock that out into four major shapes -
Pear, Hourglass, Apple, and Rectangle, and that can be combined into two groups for simplicity - one set (Rectangle & Apple) with more weight above the waist) and the other set (Pear and Hourglass) with most of the weight below the waist.
Fitting the Above Waist Bulk
- You can't let the bottom part get too full on this figure because your hips are one of your assets. So you can wear this, but make sure they are tapered more than in the picture above. It's OK to let this bottom flare a bit, but remember, you can't make it voluminous.
- You must be fitted around your hips. This may sound like the same thing as letting the bottom get too full, but actually
this is about the hip area. This has to be fitted around your hips - not skin tight and with enough ease to move (the author hasn't said so, but these look like they are constructed from woven fabric).
When I'm designing for a client, these are the things I think about for Apple and
Rectangular figures. To divide these two into their separate parts, Rectangular is usually best for accentuating their height, and Apples are great for accentuating their lower half (below the waist, not the waist).
Fitting When Most of the Weight Is Below the Waist
This includes the Pear and Hourglass shapes, which are differentiated by the Pear, which has most of her weight below the waist, but the Hourglass has some
distribution above the waist. In most of these cases, the waist is out of proportion to the rest of the body, and this makes the hips look even larger. Fitting Solutions for Below the Waist Bulk
- The key to both of these shapes is to keep the waist in proportion to the rest of the body. That means the waist is not cinched in or fitted tightly. Usually, I place the waist line about 1" above the waist, and this expands the waist enough to make the proportion, particularly in relation to the hips, much more pleasing.
- The second key is to fit to the hips as much as possible and make sure
that the boot cut leg in pants is clearly defined. That means there is a large space between the mid-thigh and the hem to better define the leg, even though this may be a bulky area.
For all four of these shapes, the projection rule is a fabulous way to make sure the
bulky area recedes and the non-bulky area projects. The best defined rule is white on top and black on bottom for Pears and Hourglasses, and white on bottom and black on top for Apples and Rectangles.
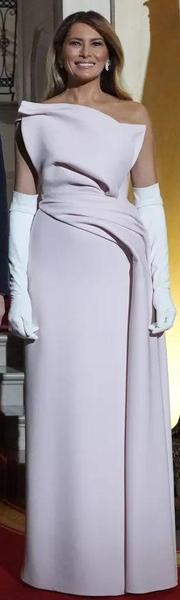
I know that took us a while to get here, but back to the pants. If I had an Hourglass or Pear come to me with this pant, I would first try to talk her out of it. It's a style that is very difficult to fit and make flattering. That doesn't mean it's
impossible, just very difficult. The hip area has to be well fitted (shaped), and an already woven pant pattern serves as the basis, putting the Hourglass and Pear versions ahead of the game. Without that woven fitted pant pattern, it's difficult.
This is a lot easier for Apples and Rectangles, but again, the trouble spot here is the hips. Because these shapes have smaller hips, they, too, should be fitted to accentuate that smallness, and the pants' flow shouldn't be
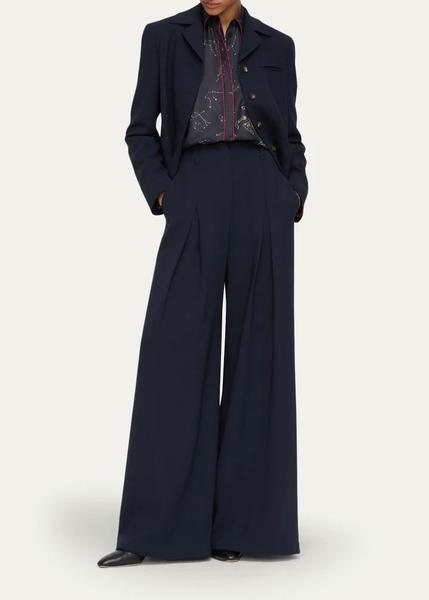
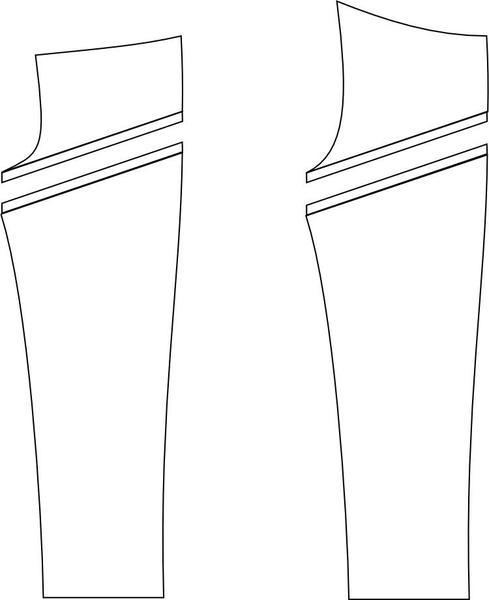
too full or overpowering. OK To the Mechanics Starting with a good woven pant pattern that fits, cut a line midway from the waist to the crotch on the side, and to the crotch point (or top of the inseam) on your pattern.
For me, I use a gusset, so I'm going to use that in this example, but if you don't use a gusset, then leave it out.
Here, I've cut that line, and then added seam allowance to the line. But the nice thing about this seam is that it offers us the opportunity to do some fitting here that won't be obvious, except to the trained eye.
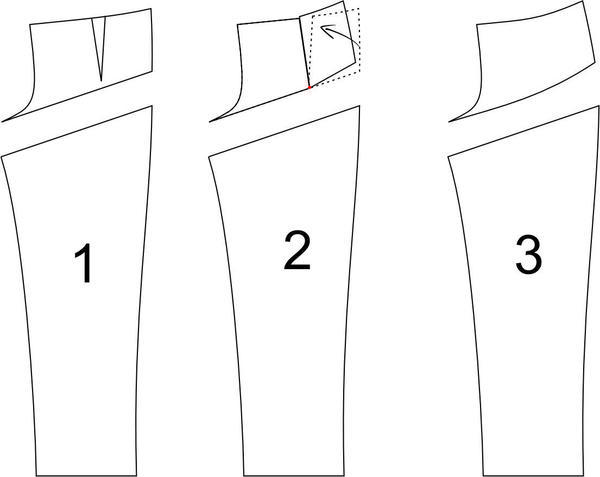
So I would do this to both the front and the back, but I'm only showing it on the front. Even though the first two tech drawings don't show a dart, you can easily place one in the pants, even with an elastic waist, just make sure that the finished waist
will fit around the hips.
- Draw in a very small, moderate dart, usually halfway between the center front and side. This dart doesn't have to be wide or big. We're just adding a little shape to this seam, that's all.
- Cut through to the dart point on one side of the dart and then rotate along the dart point, so that the two dart sides now meet. You will most likely have a tiny buckle at the dart point, but just smash
it down. This lifts part of that seam on the bottom of the top piece so that the waist-hip dart has been replaced with a side-seam/hip dart, along the seam line.
- There will be a sharp point at the waistline and at the hip line seams, and I use the Styling Design Curve to smooth those sharp points so that both seams have a soft curve to them.
On this final step, move the side seam to fall straight with the grain of the pant leg. But keep the inseam with that curve in. This is the boot cut, which is vital for ensuring the pants have space between the legs to keep them from looking frumpy.
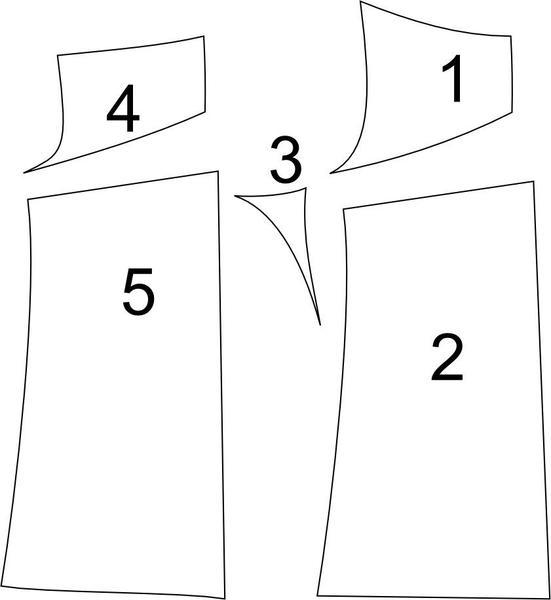
You can also see that I've added my gusset back into the pieces. If you don't need a gusset, don't use it. I like it for comfort. Assemble the pieces in order - 1, 2, 3, 4, and 5, and you're done. I'm not going to lie. This will be the beginning of the fitting. Things to look for are:
- The space between the legs, from mid-thigh to hem. It doesn't need to be big, just enough to keep it from looking frumpy.
- No matter what shape, the side seam should fall straight at the hip. If you're using an already-fitted, woven pant pattern, this shouldn't be a problem.
- The pants should also hang straight from the fanny in the back and the stomach in the front.
- The top should
not be longer than the seam in the pants. The charm and design of the pants is the seam, and the drape (or hang) from that seam, and covering it up with a long jacket won't work for this style. Don't even try to go there. A nice shell with a shirtail-shaped hem, a jacket with a soft fit (not tight) around the waist that lays softly on the upper hip, can all look nice with these pants.
One thing we haven't discussed is fabric. I'm having a lot of success with a more draping and softer fabric. Not a chiffon or anything that soft, but light-weight crepes, very feather-weight wools, tencel, Lyocell, rayon challis, viscose challis and
that sort of fabrics. Usually I do a search for tencel and that will reveal some excellent fabrics. After that I'm looking for a description like "for soft blouses, scarves, soft pants," although pants doesn't have to be mentioned for it to work as pants. BTW, this is the reason why I think the small-striped version of her beloved suit doesn't work. It's the wrong fabric and although it is thin, it looks like it has a lot of crispness to it, which makes for more body than I think this design can tolerate. In the original version it looks very relaxed and soft weight and drape. That's what would
work very well with this design.
I also think the funky print design - in an abstract, or even a floral design
Any of these designs would be spectacular. Do a search for "large floral" or "large abstract" on sites like Mood Fabrics, Gorgeous Fabrics, and Marcy Tilton, and you will find some great suggestions. But remember, they must be rayon or
challis.
I'm away from my studio this week, so I've gone through the mental steps I would use to make these pants. When Anne wrote to me about these pants, I had no intention of making them for myself to work through a lot of the fitting problems, but after writing this, the project looks more and more intriguing and like something I'd like to take on. And of course, I'll include my comments
about that.
I'm a Pear shape, and that is the most difficult shape to fit into these pants, and that's what's intriguing about it.
A puzzle dying to be solved!
|
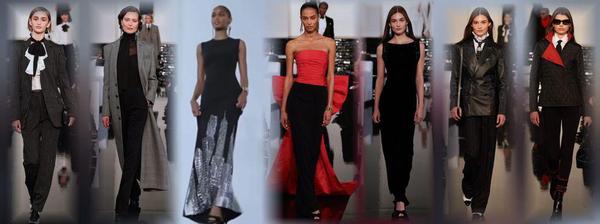
This is a sad day - the loss of a classic tradition. Armani held the line
to fashion style that ...
Tracking a fashion trend isn't all that hard after seeing a few of them.
Living from Mid-Century Modern through Twiggy...
It's worth the time to look at these styles, particularly today as
there is a group of that wants to look....
This is the way fashion used to be -- pretty, flattering and I can't wait to make some of...
NOTE: There are some folks who can't get my email, or it's sporadic, or something is hinky. I will always respond to any of you who send a private message, whether it's about the topic of the week or something else. If you don't get anything
from me, it's probably because the [email protected] email is blocked, and even a private message can't get through. In that case, I'm on Instagram often, and you can always PM me at @sewingartistry.
As a precaution,
please ensure I'm in your email Address Book and check your spam, junk, and trash folders. Some email clients get extra excited when they see emails coming into the Inbox that go to many other receivers. They automatically think it's trash or spam, and it never makes it to the Inbox. I must constantly check my spam and junk folders to ensure I'm getting the emails I subscribe to.
To view in browser along with past emails, click here. We respect your email privacy. |
|
|