PantsI could write a novel on pants...
October 17, 2025 I've been tweaking my "Armani" pants for the last couple of weeks (when I can get to my machine and drafting board). And finally, I've reached a really great pattern.
There's a lot that goes into these pants because I want them to be loose, hang well, and have a good cut. That cut is the tricky part, cause I want a more bootleg cut than the traditional (and
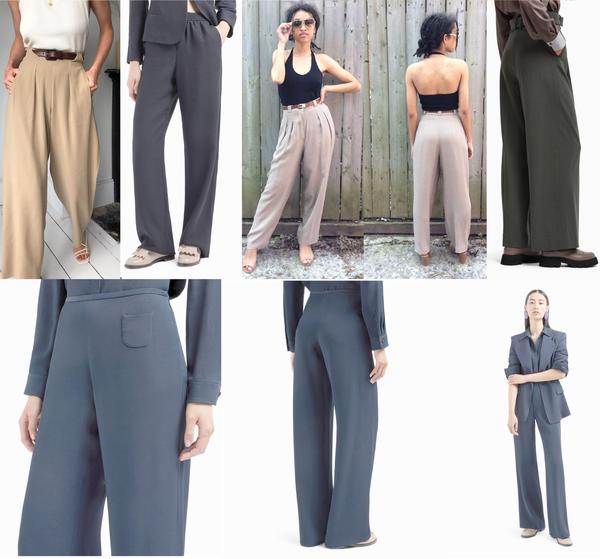
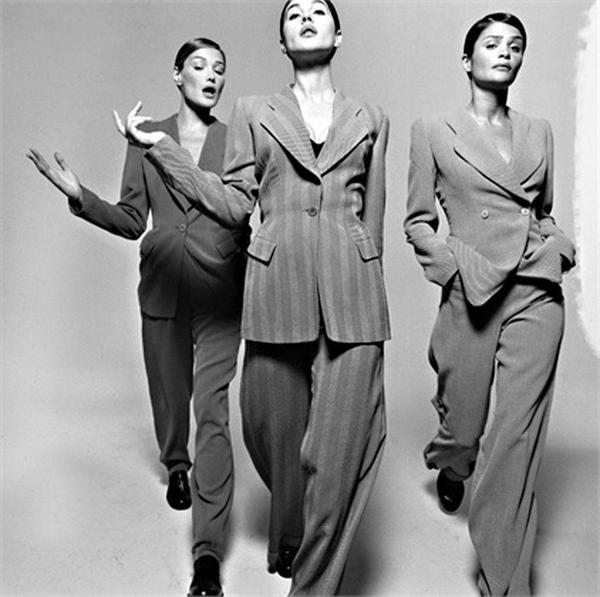
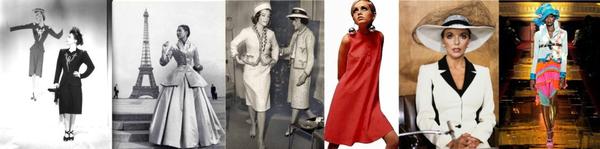
original) straight leg that Armani used in his pants in the 80s. The original pant looked like this.
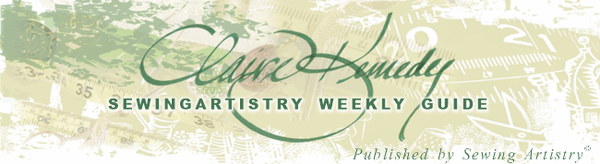
See how full the pant is on the top row? If these models didn't have their legs apart, they would all look like grandma pants - very dowdy and not flattering. Why? Because our eye has changed to the boot cut look, like the bottom row.
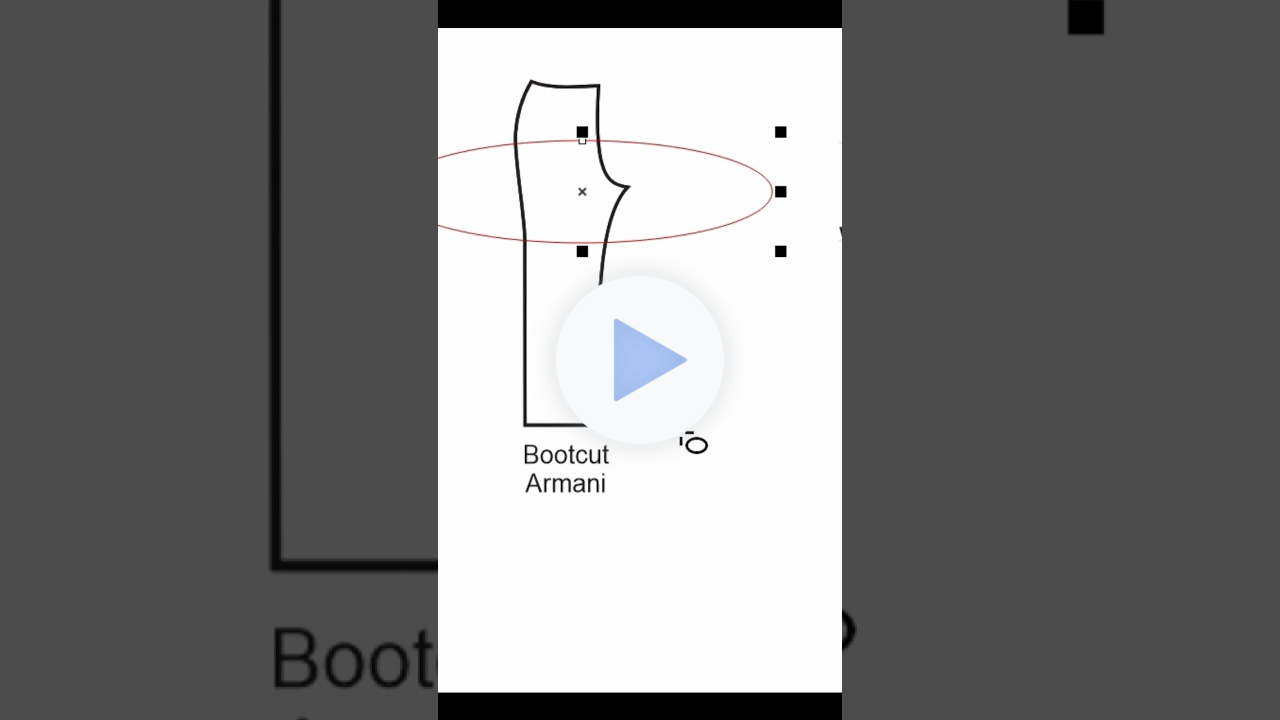
So what's the difference in the boot cut and the straight leg? Looking at the pattern - it looks like this.
It may be hard to tell the difference here, but the boot cut is sculpted away a little on the inseam and a little on the side seam, where as the old Armani was a straight leg cut. But it was very close to the body at the hip and then dropped straight from
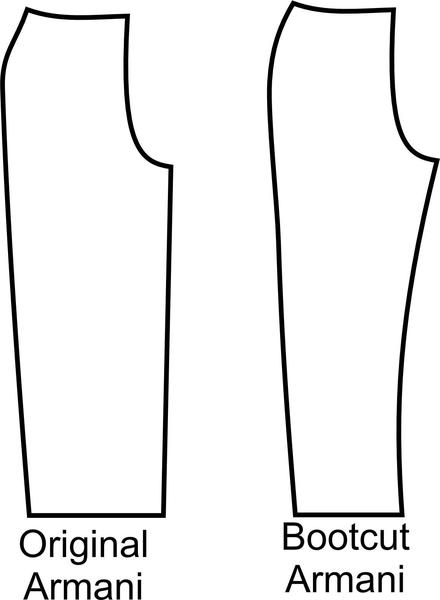
there. The bootcut is shaped more toward the leg at the upper thigh to the upper knee, and then falls straight after that. Here's how that looks on a graph to make my point.
Notice how straight the leg is in the Armani while it's shaved away in the Bell-bottom and the Boot cut. There are several reasons for all the cuts on this, and they are easy to see once you know the mindset of the times. That means that our mindset
in the 80s was different than it is right now. Here's how:
- In the 80s, we had just come out of the Bell-bottom look of the 70s and 60s. That had been thoroughly explored, varied and something we were all used to seeing. Many of those variations had unbelievably large bottoms so that the style grew more and more exaggerated. But it grew old.
- Armani, in his genius, knew he couldn't do a sculpted leg, but he could do a straight leg. His look was "new"
because it wasn't sculpted, but it was straight, but (compared to today) fuller at the bottom, but not as full as the exaggerated bell-bottoms of the 70s. The longer jacket, the fabulous drape of the pant and the skirt of the jacket, made this whole suit very new and very fun. But we look at that pant today and it's way too wide and big and baggy for our mentality.
- We come to the 90s when clothes were characterized by being ill-fitting - which meant too big and too small. So pants are either "hood-type" baggie, or they are leggings with the preponderance of stretch fabrics. The "baggy" pant with the fabulous drape is gone. It's now baggy beyond belief or skin tight.
- Part of that move to that tighter pants developed into a boot cut or yoga pant.
I call these cuts the same, even though they may have different names. This cut comes out of the Grunge period and not the 70s Mod look, so when we take that yoga/bootcut look and put it into a delicious Armaniesque rayon challis, BOOM - we have an updated Armani pant that looks modern and good because we're not doing a bell-bottom (even though it has the same shape), and we're not doing skin tight (leggings). It's a newer look - it's not the Armani of the 80s but of the 20s.
It's not ill-fitting pants, too big or too smal. It fits, but not skin-tight - it drapes. Here's what that looks like in slow motion.
This probably took me six weeks to figure all the nuances out. But a couple of caveats: I had two weddings to do, and I'm extremely picky about how this looks and the look I was after. Right now I'm tired of the leggings and want a pant that I
can wear that will be a little more age-appropriate. I'm in my 70s, so leggings are a stretch for me (no pun, I promise). But a well-draped pant. is just the ticket.
There's a lot of individual peculiarities to these pants that make them EXACTLY what I want. First and foremost, they hang straight. That's the key. You'll see a "break" at the bottom, and the more I made these, the more I liked that break.
I found out by making some others too short, and they don't work at all - not enough fabric to cover the shoe.
The original 1970s pant had a break, so this is right where I wanted this. That break is the second part. The third part is that these pants fit firmly on my waist so that when I stand and sit and stand again, they fall in exactly (well, pretty close
to) the same place as when I stood and sat all day while I'm wearing and writing this. These features didn't come easily and took a lot of
work on my part. My butt and my legs are in high contrast with each other, as I carry my weight on my butt right below my waist to just above the thigh area. I don't carry too much in my thigh and carry hardly any in my legs. So my legs are something I do like to show off. But my legs are short in comparison to the rest of my body - I have a high waist and very long torso. So this comes down to this 1 - 5 - 1 is excellent and 5 is needs to be hidden
- Neck - 1 - but not too much drooping there
- Shoulder - 1 - a little smaller than it used to be
- Bust Chest - 2 - a little larger than it used to be
- Waist - 2 - High, but too small in proportion to my body
- Stomach - 4 - poochy
- Fanny - 5 - flat and broad
- Hips - 5 - broad - where most of my weight is
- Thighs - 4 - heavy on top, but nice about mid-thigh
- Legs - 2-
from mid-thigh to ankle
- Silhouette - 3 - Needs some attention - thick at hips
I encourage each of you to go through a list like this and grade each part of your body. This is going to tell you exactly how you are going to show off the good part and and hide the bad part, and for me that's what clothing is all about. And
when I'm working with a client, I'm very honest and making sure that my client is aware that I'm aware of her places she wants to hide and the places she wants to shine.
Using that rubric above, pants can be a real problem for me, especially woven pants which is what these are. Here are my issues from a printed pattern out of the envelope.
- I have to make this wider at the hip without looking out of proportion to my height and my lower thigh, knee and calf area (which are much smaller than my hips)
- I have to make my pants look like they are longer, as I'm short
- I want to be able to show off my waist, without making my hips look bigger.
- I don't want my inseam height (crotch depth) to rival the NBA players, but I don't want it
splitting me in half when I sit down.
- I know I'm going to have to redesign some tops which will have to be a little shorter so that I don't look like a box and trying to cover myself up with big, shapeless bag.
- I want a little drape (break) at the hem because I don't want them to look too short.
Basically the hardest part is going to be around the hip, because my biggest part is right at my crotch depth. That creates a huge problem - other than my weight, it's involves making sure that the legs are the right size as well as the hips being the right
size. That means that you often have to ad width to the top of the legs at the same time you add to the hips. This is that kooky area where the crotch is the inbetween the whole measurement of the hip to the measurement of the thigh x 2. Here's a video on how I did that and some suggestions on how is the easiest way to wide the leg and the abdomen at the same time without sacrificing the line of the garment.
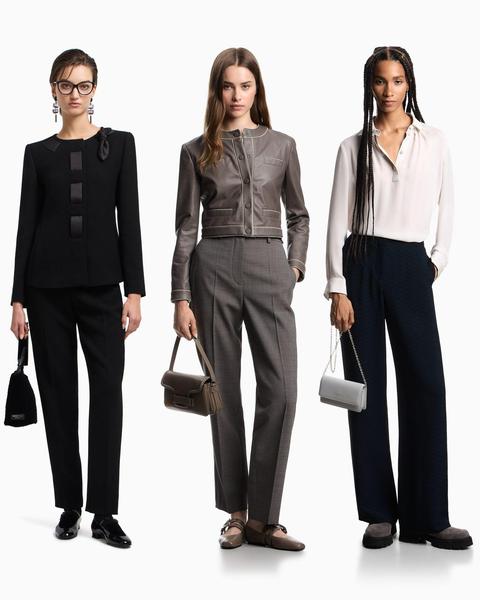
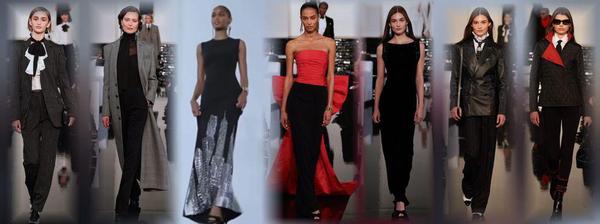
Here's the Armani pant today.
Notice all the space between the legs? This is Armani moving into those more bootcut/yoga cut pants. To make the pants drape correctly (they're tapered in a lot at the hem), he's made them short. I'm not going to do that cause I need all the
length in the world to make these pants make me look taller.
I said this took me about six weeks to finish this. And yes I had some brides, and we went up to the farm to cut the corn. (You'll be glad to know that I watch while Walt actually knows what's going on!) But often I had to sit back and although I had a great pant, I needed to tweak it a bit.
Don't be afraid to tinker with your design till you get it right. On pants, using the alteration
technique I used in the video is a great solution to making sure that you have a good drape from your hip, stomach and butt, and after that it's all about comfort and ease. Don't get bagginess confused with ease. They are not the same thing, however there is a fine line between the two, and the best way to discover this is with working with your pattern till it's what you want.
Another huge factor in all this is fabric. I'm using mostly rayon challis sometimes
rayon/linen or rayon/cotton. The linen is really the better of these two blends and drapes beautifully. You're really looking for a blouse or skirt weight fabric. Rarely will it say for pants, because these sorts of pants you can't buy, therefore fabric stores don't think you want this fabric for pants. You know if you don't see it, you don't want it! Great logic, but that's the trap the consumers have to deal with. Not us.
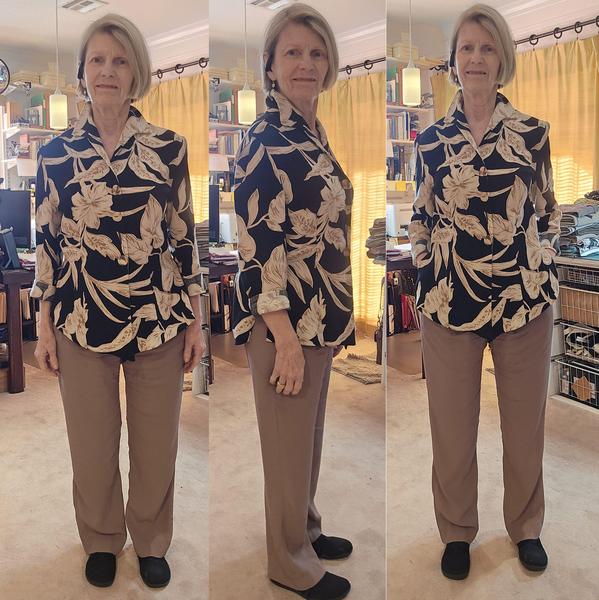
Right now to have
these pants (and now that they are perfected, they take a couple of hours to make up), is the height of luxury and fashion for me. I'm wearing this with a shorter blouse and jacket which is a totally new silhouette. Messing with the pants and tweaking them took some time, but it's so worth it now. I have a stack of rayons that are just begging me to be cut out as these pants and make them up fast.
A couple of quick notes here.
- For this woven pant, I'm using the Tessa Pattern from StyleArc as my base pattern. I use the StyleArc size chart and buy the pattern for my hip measurement. From there, I'm tweaking it to fit me, whether adding to inseam, crotch seam, and side seam, and/or
adding a gusset, the primary function is that the pants must hang correctly (which is that they can't be bowed - tilting in - or splayed - tilting out - and they can't be leaning forward or backward). Then you can decide if you want a crush or a break in the hem (the pant hem is longer) or if you prefer it shorter.
But the Tessa pattern has the main ingredients for the Armani pants without having to worry about shallowing in or out
of the leg style. Now, after you get the pants to hang correctly and hem well, you must determine if the shallowing out shows. If it doesn't show, then you will need to shallow out some more - a little goes a long way here, ½" on each seam will shallow in 1" total. - The gusset is not only great for fitting, but it's an excellent tool for laying out your fabric. This is a small piece, but when added onto the back of the pant it makes cutting those pants very
expensive, cause the layout can often take two pants lengths. If you cut the gusset as a separate piece you can easily fit it in the space between the legs and no one will know the difference, except that your pants will hang marvelously, and be comfy.
- The gusset is also a useful tool in store bought pants. So even if you didn't make your pants, but love them very much, get a similar weight, color and pattern and cut a gusset and add to your pants from a retail clothing
store. It will add the comfort and hang you want in your pants.
The SewingArtistry Resource Library is designed to contain information to not only make your sewing better, but to aid in you fitting and flattering your shape, size and style. Check it out.
I'm taking a break from teaching right now, but I am able to do Zoom demos or talks for your sewing group. Contact me for details.
|
This is a sad day - the loss of a classic tradition. Armani held the line
to fashion style that ...
Tracking a fashion trend isn't all that hard after seeing a few of them.
Living from Mid-Century Modern through Twiggy...
It's worth the time to look at these styles, particularly today as
there is a group of that wants to look....
This is the way fashion used to be -- pretty, flattering and I can't wait to make some of...
NOTE: There are some folks who can't get my email, or it's sporadic, or something is hinky. I will always respond to any of you who send a private message, whether it's about the topic of the week or something else. If you don't get anything
from me, it's probably because the [email protected] email is blocked, and even a private message can't get through. In that case, I'm on Instagram often, and you can always PM me at @sewingartistry.
As a precaution,
please ensure I'm in your email Address Book and check your spam, junk, and trash folders. Some email clients get extra excited when they see emails coming into the Inbox that go to many other receivers. They automatically think it's trash or spam, and it never makes it to the Inbox. I must constantly check my spam and junk folders to ensure I'm getting the emails I subscribe to.
To view in browser along with past emails, click here. We respect your email privacy. |
|
|