I'm Learning How To Sew - SortaDecember, 2024 Learning never ceases when you're an artist. It's a given in the artistic community. Picasso went through a Blue Period, Rose Period, Primitivism, Synthetic Cubism, and many other periods. Picasso had to not only learn what made those periods unique, but had to learn the technique to express them. I'm doing good to make it from Mod (a straight dress, but in reality, it had shape and line, and you had to know that line to make it
correctly. There was a big difference between the J. C. Penny's version and the Mary Quant version)...to Bohemian (Sloppy and full, but actually not. It had shape again, and it wasn't full everywhere, but where it was full it was full and flowing. And it had to be made of the right fabric - nothing bulky or big, or else it would look like a sack)... to the Power suit (talk about tailoring - if you didn't know how to tailor, then you garment look like a limp mess)...and then I
dropped out with Grunge.
The same thing is true today, which got me thinking about how one person succeeds through all those learning phases and another person doesn't. Mostly, it's attitude and passion. However, there are some, like me, who haven't got any better sense and are strictly about persistence and stamina. A puzzle will not get the better of me...period!
From this to having to completely rethink the construction of this garment. These little delicate button holes will not hold up on this flimsy, draping sweater fabric. Yeah, I know, this doesn't look like green sweater fabric, but it really is (in a
minute the whole garment).
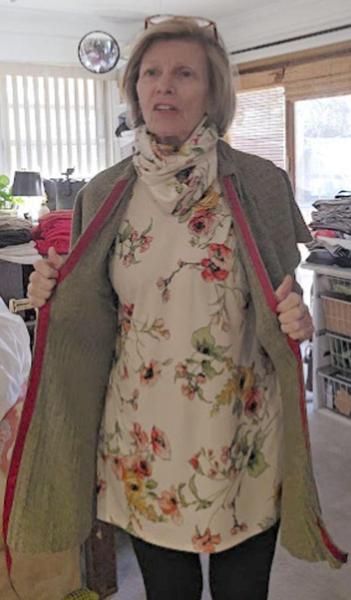
So I picked up this heather green knit. I don't know where, but it's green, and I can't resist green. It's a very drapey fabric. Think of crepe de chine the medium weight, only add a lot of weight - not like 4-ply crepe de chine - but as heavy only
draping like chiffon. That's this knit. It's yummy to wear and hell to sew with. Practically every seam has to be treated with a special technique that will either allow good stability or a flowing softness. Yikes!
See it's green. But unfortunately no one in the state of Oklahoma has olive green grosgrain ribbon. I mean PLEASE!!!! So I settled for this sort of cranberry which looks good now, and not to Christmasy for later in the Winter, cause I can tell I
will be wearing this all winter. I love it already and it isn't finished.
So what should we do to achieve that stability and flowiness?
Traditionally,
the edges of a garment should all be stabilized if not crisply finished. It helps the garment look "finished." If it's flopping around like a summer garden dress, it defeats the idea of a jacket. And this fabric is pretty flopping, so putting a stabilized crisp edge will make it look much more professional and stable.
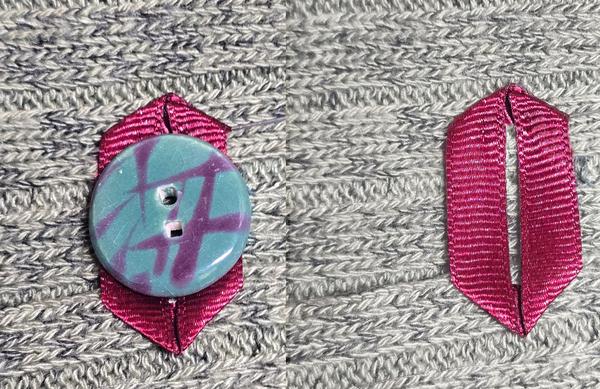
This will also be an excellent base for those flimsy little buttonholes. They aren't poorly made; they are rather delicate.
These are going to require something very sturdy to be sewn to, to make sure that they work. This grosgrain isn't the best ribbon in the world, so there's that. It's a rather poorly (read: cheaply) woven ribbon, but it's all that's available.
TIME OUT FANTASY: It's at times like these I wish my arms would reach NYC cause I know right where to go to find the perfect ribbon, but getting on a plane, going and coming, is such a pain when I could reach my long arm to this one place, pick it out, check out, and bring my arm back with the perfect ribbon. I watch way too many cartoons!
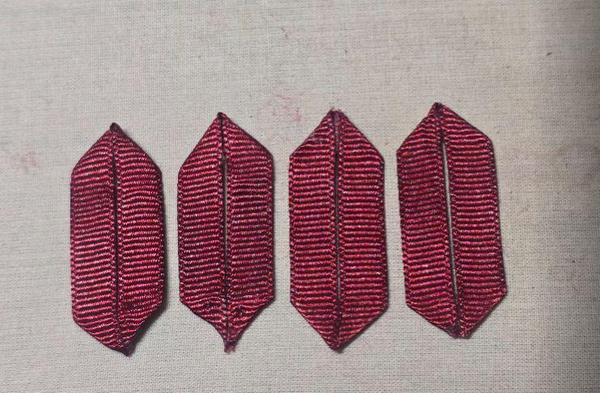
Back to reality. The technique used here was basically simple. Keeping the technique simple and easy is going to save
extra wear and tear on this cheap ribbon. So I used WonderUnder, which I cut into little triangles, pinned them down, pressed them within an inch of their little lives, and voilá, they looked smashing. A little Fray Check on the edges, and they look fine.
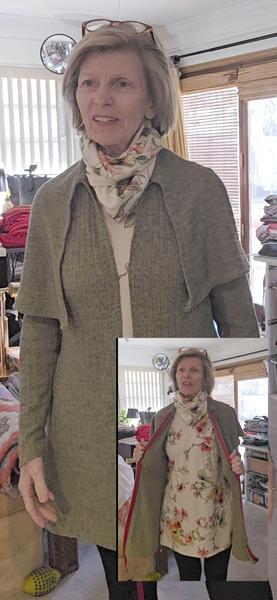
Back to the jacket. I had also found a ⅝" cranberry ribbon to go with the ¼" ribbon for the button holes, so that would be used around the collar and the front to create that "interfaced" feeling. Believe me, when I put this garment on, the ribbon makes the front feel D-I-V-I-N-E!!!!
You can see on the inset that the ribbon goes all the way to the bottom. But it's also around the neck. Knowing what makes you feel good and what matters in your clothing is crucial when you are working in the creative arena. There are some quick things I know about how I like my clothes to fit, and most of them aren't negotiable, and when they all work, my garment is a dream - or
rather DIVINE! Some of them:
- Nothing tight around my hips.
- My waist is actually out of proportion to my hips and bust/shoulders. It's actually too small which sounds like something you should want. But it makes my hips look even larger, and they are large enough as it is. That doesn't mean I don't like to at least elude to the shape of my waist, but not cinched in like Marilyn Monroe.
- I love things around my neck. I think I have a thin, bird neck, and having a lot of fabric around my neck is the cat's meow!
- Clothes must hit me on the shoulder - that's it, no negotiation
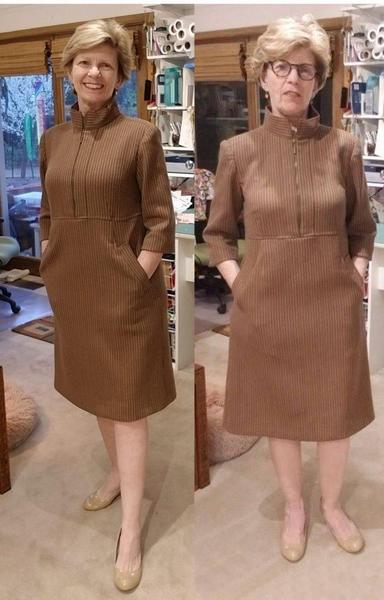
- The bust dart has to hit or at least angle to the bust point on my body. This is another one of those things that you may think can slide. But a bust dart that is pointed too low or too high can ruin a
garment. A bra that is too low will age you 10 years, while a bra that fits well and your dart that fits well will take 10 years off your age. I don't look 72 in the left, but I look 82 in the right one! This is the same garment; only the left side has a good bra (new one), and the dart is pointing in the right direction. The right one has an old bra; although the bust point is correct, it looks horrible.
- I like the neckline in the back to hang high on my neck. If it's low, I keep pulling it down, the garment hangs wrong, and it's a disaster after that.
- I like the sleeves fairly fitted. This keeps the bulk to a minimum.
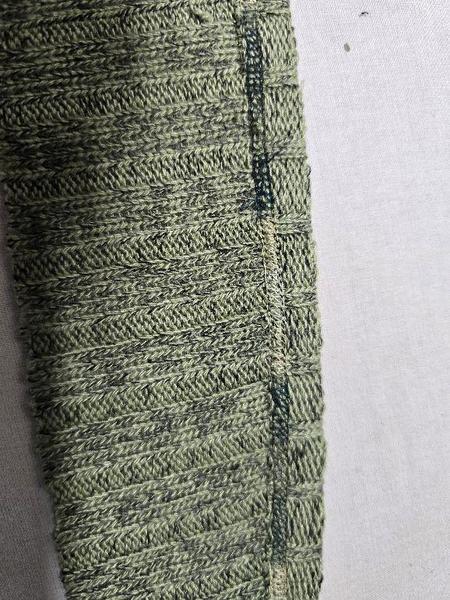
So here I am with the first iteration of this garment with this funky little
finishing technique. The coverstitch shows on the right side with this cool, variegated-colored thread. The colors couldn't be better for this green garment. But the front is a little flimsy with this finishing, and it made it a little too stiff on the collar. That is no problem. I would simply take this coverstitch off. It's very easy to do that. Clip the first couple of stitches on the right side, pull the looper, and boom, it comes right
out!
Oooooooooooooooooo boy! Let me tell you. The cover stitch is usually a dream to take out. But when it's a satin stitch, it tangles in itself, and the looper only works about 1" to 2" and then it locks again. Ugh!
As I'm fond of
telling customers, the long work comes in removing stitching. It takes about 1/10 of that time to put the stitch back in!
So I felt like I was learning how to sew all over again.
- Put in one decorative stitch only to take it out which took fooooooooooooooooooreeeeeeeeeeeeeverrrrr!
- Then, I had to figure out a new way to do the center front with the ribbon - to show or be hidden, and how to do that so I would have something substantial for the delicate buttonholes to sew onto.
- Then had to take out that decorative unique stitching all around the collar hem and sides. I
should have just cut it off, and it would have been easier.
By the way, this is a mistake that newbies make, and I think it's an easy one. Newbies think that there's only one correct way to do a technique - take out stitching. I could have cut this down probably about 5/8" and it wouldn't have hurt the design at all.
But there's something about taking out that stitching that we all think is a must-do, and therefore, suck it up, buttercup, and get it
done. There are easier ways to do something to achieve the same look. Sometimes, you must take out a seam to make it look correct. But there are also times when you can use a simpler method to do the same thing and achieve the same look. Here, I think I was in such a stubborn mood that I wasn't going to let taking a seam out get me down or cause me not to finish this garment. - After thinking about how to do the center front, I created the same ⅝" cranberry
around the neckline. This collar was attached to the right side of the jacket and sewn to the wrong side of the collar so that when the collar folded down, it was the right side showing. On the inside, I covered the seam with that cranberry ribbon, using the cover stitch, which is a bit rough looking, but it doesn't show and feels so dreamy around the neck.
- Finally, how to finish the other seams. I have this fantastic Sewkeyse knit tape that I adore. It's incredibly
lightweight, but there's enough to it that you can fold a knit hem up, and it will be the same all the way around and will have that very delicate finished edge without being bulking or stiff or contrived. The one above is white but comes in black and even nude. Perfect for the hem, which does not need to be crisp like center front or the neck, and the sleeves.
And At Last, I'm singing like Etta James. I have a garment. And yes the huge amount of time spent on this garment is worth it. I can tell just the couple of times I've had it on, I'm going to love it.
That's because the thinking never quits when you're sewing and when you're an artist. It's almost like a plague. You are constantly looking for a new challenge and a new puzzle to solve.
Be glad you have this. So many don't and
live boring and dull lives and wither away far earlier than they should because they don't use their brains. We were meant to ask questions and solve puzzles. A favorite philosopher and writer says "Mankind is not meant for Utopia. If we have it, we start creating drama to make our lives more conflicted and enjoyable. Without a noble aim, you aren't actively engaged."
Being actively engaged is like being caught up in solving a sewing puzzle. You start sewing at 9
am, and suddenly, it's 4:30 pm, and you wonder where the day went. It's not that you've been sitting around doing nothing. It's that you've been actively engaged in a project or puzzle. That sort of life is a noble aim, and when you have that noble aim, it makes life tolerable, knowing that you only have a limited time on Earth. That noble aim can be anything. I make wedding gowns, mostly for abnormal or subnormal shapes, or even more fun from past gowns, to
reshape and restyle them for the newer generation in a style and shape that makes the bride feel marvelous. It's not a grand or earth-shakingly important task, but I enjoy making gowns for my irregularly shaped clients.
The same with all my students. I may not be the ultimate teacher, but I love sharing and spreading my passion. The joy, fulfillment, and satisfaction in watching a student solve a sewing puzzle or work at shaping a garment perfect for their shape
and size is an incredibly noble aim for me. And, of course, one of the most magical moments is seeing a student discover that line, shape, and size that most flatter their body and lifestyle is probably one of the most significant highs. I do that for my clients, and I've done it for so many that I'm not sure there's a client or student I couldn't make look flattering and project a positive side of themselves.
I suppose if I have a wish more than anything for my
students, it is to know that you can look good, project a responsible and professional look, and have a flare and unique quality to your presentation that makes you stand out, not like a sore thumb, but as the calm, quiet, and competent person that we all are.
Well, I got a little off sewing, but at my ripe age, I'm thrilled to have chosen this path in life, although when I made that choice, I wasn't sure I would make it. I worked incredibly hard, but it was joyful work.
And I finally figured out that no matter what we do to make it, we must work very hard. Why not make it something we love to do? That way, we can have fun while working so hard.
It's like these weekly emails. I love doing these for you, sharing my passion, and pushing you to understand that you can look good, feel good, and present yourself well without losing comfort or a lot of money. This is a noble aim for me!
Thank you for allowing me into
your sewing space!
The SewingArtistry Resource Library is designed to contain information to not only make your sewing better, but to aid in you fitting and flattering your shape, size and style. Check it out.
Look for future classes coming in 2024
The Core Pattern Shirt, (one of my favorites for woven core pattern that you can make into a myriad of different
garments),
Basic Knit Top (core pattern class for knit basic tops, shells, tees, dresses, and tunics)
|
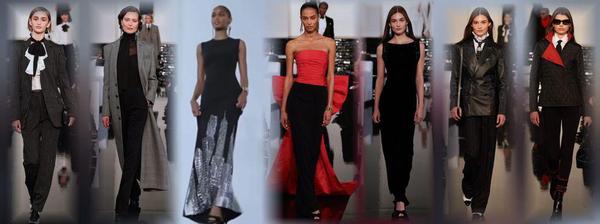
Tracking a fashion trend isn't all that hard after seeing a few of them.
Living from Mid-Century Modern through Twiggy...
It's worth the time to look at these styles, particularly today as
there is a group of that wants to look....
This is the way fashion used to be -- pretty, flattering and I can't wait to make some of...
NOTE: There are some folks who can't get my email, or it's sporadic, or something is hinky. I will always respond to any of you who send a private message, whether it's about the topic of the week or something else. If you don't get anything
from me, it's probably because the [email protected] email is blocked, and even a private message can't get through. In that case, I'm on Instagram often, and you can always PM me at @sewingartistry.
As a precaution,
please ensure I'm in your email Address Book and check your spam, junk, and trash folders. Some email clients get extra excited when they see emails coming into the Inbox that go to many other receivers. They automatically think it's trash or spam, and it never makes it to the Inbox. I must constantly check my spam and junk folders to ensure I'm getting the emails I subscribe to.
To view in browser along with past emails, click here. We respect your email privacy. |
|
|