The Pants Dilemma - Part IINovember 22, 2024 After the long discussion about expectations and planning, it's time to discuss some really helpful alterations and how to make them. First - I created this video about fitting pants. What I developed was a four-part method. (see below)
- Cut your pants (this is a muslin we're starting with, so when I talk about fabric here, it's the muslin fabric) with 3" added to the waist. If you are swayback, you might have to add 6" to the waist. Choose the pattern that has your hip width + 2". Sew up the pants, but no
darts at the top and no waistband added - that means inseams, and side seams only.
- Put the pants on and draw them up to the crotch height you like best. Notice if the crotch seam is cutting into the middle of your body; that's too high. At the same time, you're not playing for the NBA, so no crotch line at the
mid-thigh. This should be comfortable enough to sit down, so mark the height (pin the waist to the underwear, and sit down and see if it's comfortable), and sit a couple of times to ensure you don't have that dreaded "camel toe" look.
- Now, it's time to correct the pitch or tilt of the pants. You will watch me move the pants back and forth from too much front to too much back and watch the wrinkles. These are the giveaways about how a pant is hanging.
After you correct the pitch, pin to your underwear where that hang is correct. You'll also notice that these pants are NOT skin-tight. There is no such thing in woven pants, and therefore, your hang must be good. If it isn't, then your pants will always look weird. This is all about the drape.
- The last is to ensure that your pitch from side-to-side (splayed or bowed) is correct and you do that by raising or lowering your side seam at the waist.
Your center front and back should be marked to make sure the front to back pitch is correct, so don't move those markings or pin.
After you finish all your markings, side seams and center front and back, sit down to check your crotch height and that it's comfortable.
Here are some caveats to watch for while you're doing this. - Every one of us is not
symmetrical. That means you will have one hip higher than another, one leg longer/shorter than another and there will naturally be a tilt or sway to your posture. Please take this carefully into consideration. When your pants are hanging straight, believe it or not, it helps your posture look straight, too. This is the whole idea about fitting your pants - to ensure you look the best.
- This is about flattering your figure, not about changing sizes. While we can wear skin-tight clothes (leggings and other activewear garments), this is not that look or that garment. So if you think you can have a woven that fits tightly around your body, you can't - don't try or even expect that result. This is about expectations. I've seen a lot of students who say that their pants are baggy,
when in reality, what happens with a good drape on woven pants is that your posture, even when it's bad and you're standing funny, the pants with a good hang, will correct all that.
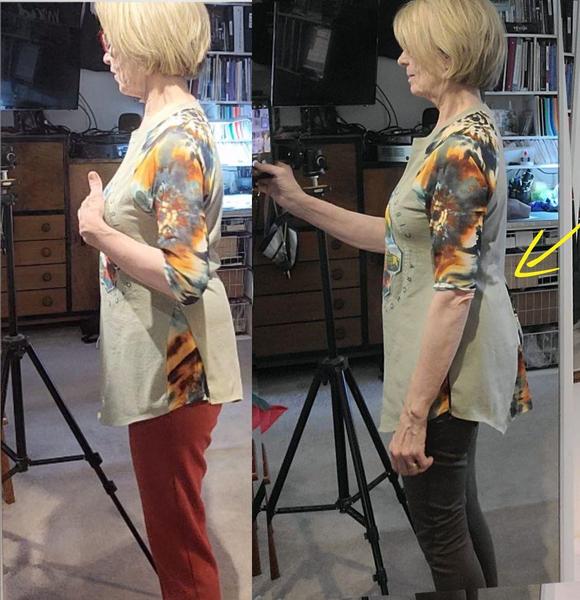
The one on the left clearly shows my sway back where i'm leaning forward while my fanny is tilting back. I have the exact same stance and posture on the right, but because the hang is straight, it looks much more normal. This is the disguise and trick
of the eye that you can do in your tilting of your pants.
This makes my point. On the left are properly fitted pants, while on the right, there's a dramatic tilt to the pants - the model looks like she's leaning forward with a little sway-back tilt. The pant on the left has no hint of a sway back and
no hint of leaning in any direction other than straight. The pants, to the uneducated and properly
This is a great start to your pants; the only thing left to do is mark any darts you need around your waist, waistline, and where your waistband will go. This muslin should hit your true waist (read this for a review about that) because this
is going to be your core pattern for pants. You will draft other variations from this pattern, but you must know where your actual waist is before making any variations. If you want a dropped pant waist, that's fine, but how can you drop the waist correctly if you do not know where your actual waist is. You can guess, but that takes a lot of time. Knowing where the actual waistline is is the best way to construct a correct dropped waist pant. The same is true of a
higher waist - how can you tell where a higher waist will fit you if you don't have the natural and actual waist marked on the pattern?
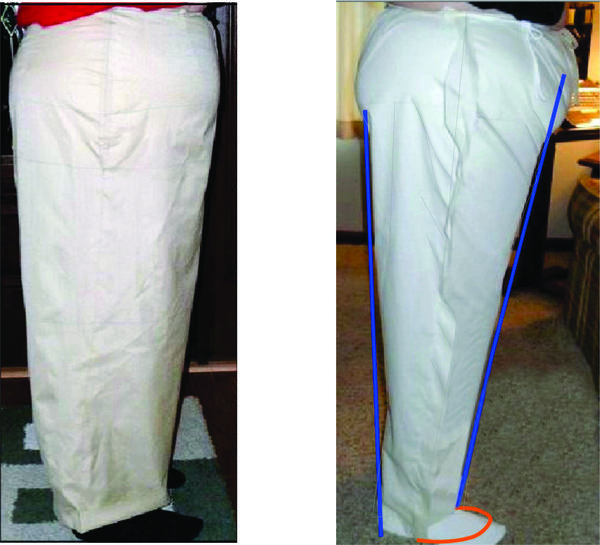
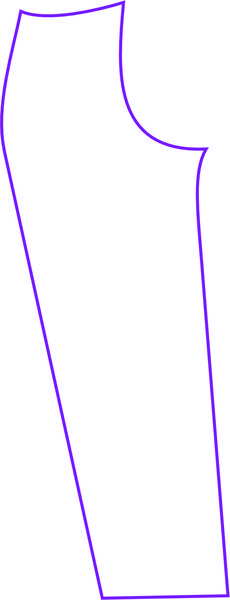
So let's walk through a pretty common pant alteration - the sway back alteration. This is a pretty good look at what that looks like from a side silhouette:
There are several things to note:
- The hip measurement is the same whether you are sway back or neutral pelvis.
- But the back requires much more fabric than the front does.
- There's a tendency to take in at the waist because there is usually a wrinkle along the waist line which is a clear sign for a swayback alteration.
This photo makes the case clearly that a dart at the waistline is not the cure for this. So what is the cure. The cure is in the tilt or pitch of the garment.
See the pitch on the left? It's pitching toward the back. The pitch on the right is clearly more vertical to the horizon and, therefore, much more pleasing. It makes my figure look like I'm straight, not tilted (which I am). That's one thing
about fitting and flattering our figure is that we can actually pull of some pretty amazing visual trickery! Making us look straight and upright is one of them.
So, let's get some real help on how to make these tilt changes in our pattern. I'm dealing with the sway back because it's probably one of the most prevalent figure faults out there.
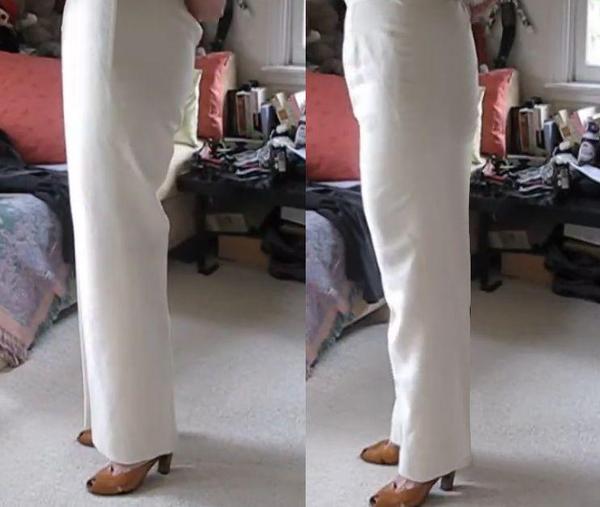
Here is a typical problem for a sway back. Here's an explanation of the problem. When the model has the pants on where they are seated, the back is swaying forward. When the model pulls up the pants in back, the back is flat and straight, but
the front is all messed up.
So which one do you fix? The front or the back. In this case, when the pants in front are straight the waistline in back is way low. When that waist is pulled up, the back straightens up, so it's the back that needs to be fixed. The front when on the way hangs great!
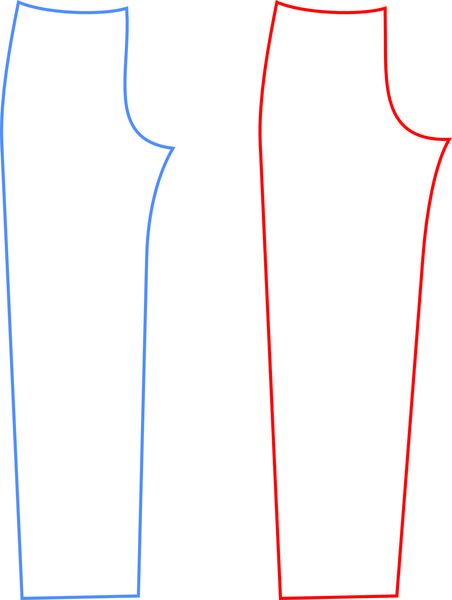
So here we have a front (blue) and back (red). You can usually tell the difference because the back has a longer crotch seam than the front.
When you put the two together on the side seam they match, and everything is hunky dory, except that we know that back piece waist line isn't high enough at center back, so we need to fix that.
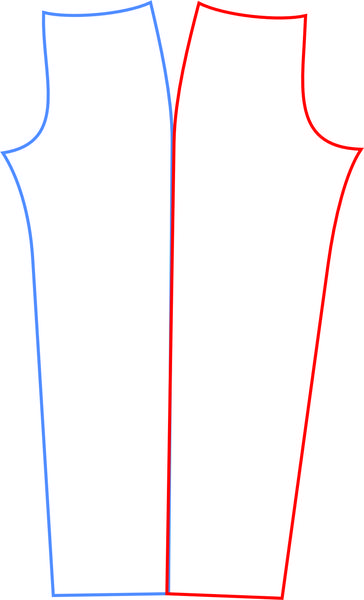
We have a tilt problem on the back which is causing the wrinkles, so we need to tilt the patter so that we have more at the center back to inseam crotch seam. When we tilt at the side waist, which fits fine (remember the height at the side was good, it was
the back that was all messed up), this is how that would look. See how we are raising the waist in back and how we have more fabric there? This tells us that we are headed in the right direction.
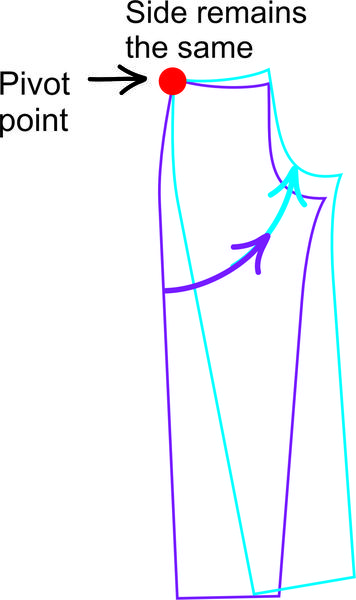
But look at how that raises the crotch line. There was nothing wrong with the crotch depth, so we need to correct that crotch depth. Actually, this is normal in sway back alterations. The center back to the top of the inseam needs to be longer, not shorter.
We've added the fabric at the top but taken it out at the crotch, so we need to correct that.
So don't let this confuse you. Put your pattern on a grid (I like to cut on an Olfa Mat that has a grid I can see under in and line my patterns up on a straight of grain so I can see a good horizontal and vertical line of the pattern. Here I've drawn
a vertical line at the bottom of the crotch seam. When I do that, then I can tell how far to lower the crotch on the new back pattern I'm drawing.
So to review, I've put my old pattern under some tissue and I'm tracing out my new pattern. I first drew the waist line of the pattern marking the side seam and the center back seam with a dot on both, but not any lines other than the waist line. I've tiled the pattern - no more than 2" or however much you pulled up in
back to cover your back and meet the waist and center back. If it's more than 2" then I would cut a new pattern with 3" or more added to the top of the waist.
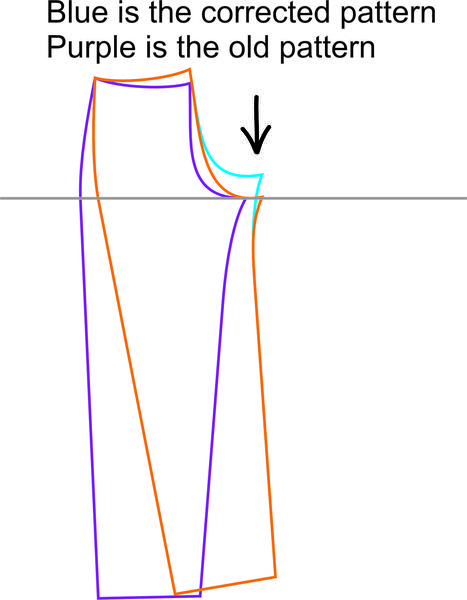
In this case we've now raised the waist 2" and now we need to do something about the crotch height because we've raised the waist AND the crotch height, but the crotch height was good at the original height, so we're going to draw that vertical line (perpendicular to the straight of grain) and then lower or trace the
new pattern crotch line to start at the new higher point in back but go all the way to the original bottom of the old pattern.
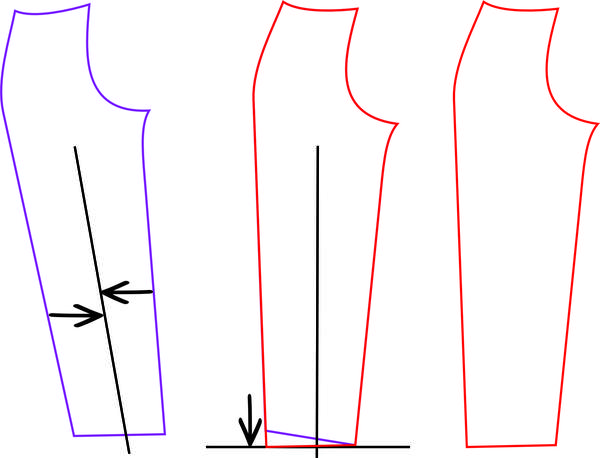
OK holy moly - we've got a really weird tilt here. But don't think about this too much. All we need to do is create a good straight of grain on this pattern and you're home free.
So how do you correct that tilt cause it doesn't looks tilted. First thing is to determine the straight of grain. That's easy with pants. Measure half way between the inseam and the side seam at the hem and then again at the knee or higher.
Draw a line between those two points and that's your straight of grain.
Now, you can tilt the pattern to draw a perpendicular line to that straight of grain. (Middle picture). Now you've got a pretty straight pattern with the crotch at the original height , but the waist in back is a lot higher.
Not only that, but we haven't messed with the side seam, so it will match the front seam.
You may have some tiny alterations—swinging it back
and forth just a little will help correct this. Once you have a good hang, then the pants are seated correctly. You will need to mark your pants AT YOUR WAIST and make sure that when you sit and stand, the pants return to the same place. BINGO—you have it.
You'll notice that these pants are a little fuller, and that's OK—because we have corrected the tilt, they will hang in the correct position.
I've tried to go through this with the instructions and steps and the
reasoning behind each step so that you have a good idea about how to correct your pants.
Pants are notoriously difficult to fit. You're fitting the tummy and the hips and the thighs and the crotch shape, crotch height, waist, and length - and then you have to calculate ease in the woven version so that you can sit, get in and out of a car, bend down, and at least do some basic movements so that you feel comfortable. Woven pants are never supposed to fit skin-tight; if
they do, they don't fit correctly. Just because you may see something in a magazine or movie doesn't make it fit correctly. Those clothes in movies are mercilessly trashed and no one in the movie is the least concerned about it. These are never a good source for fitting ideas or even practical living with woven pants.
But, once you have that pattern, pants are a cinch to make up repeatedly. Not only that, but because of your unique genealogy, your size,
shape, and posture will remain the same, and basically, you will only have to add or subtract widthwise, and you won't have to redraw or reshape the pants hardly at all. My current woven pattern is from the pattern I made with my mentor in the 70's. Believe me, I've changed shape since then, but because I have kept up with it and changed it a little at a time, it still works for me. The sway back is a widespread alteration, but there are others like a large waist, one side longer/shorter than the other, and one hip larger/higher than another, but once you have the pattern, no matter what your faults are, having your
own pattern is a joy and the freedom to have pants anytime you want.
The SewingArtistry Resource Library is designed to contain information to not only make your sewing better, but to aid in you fitting and flattering your shape, size and style. Check it out.
Look for future classes coming in 2024
The Core Pattern Shirt, (one of my favorites for woven core pattern that you can make into a myriad of different
garments),
Basic Knit Top (core pattern class for knit basic tops, shells, tees, dresses, and tunics)
| |
Tracking a fashion trend isn't all that hard after seeing a few of them.
Living from Mid-Century Modern through Twiggy...
It's worth the time to look at these styles, particularly today as
there is a group of that wants to look....
This is the way fashion used to be -- pretty, flattering and I can't wait to make some of...
NOTE: There are some folks who can't get my email, or it's sporadic, or something is hinky. I will always respond to any of you who send a private message, whether it's about the topic of the week or something else. If you don't get anything
from me, it's probably because the [email protected] email is blocked, and even a private message can't get through. In that case, I'm on Instagram often, and you can always PM me at @sewingartistry.
As a precaution,
please ensure I'm in your email Address Book and check your spam, junk, and trash folders. Some email clients get extra excited when they see emails coming into the Inbox that go to many other receivers. They automatically think it's trash or spam, and it never makes it to the Inbox. I must constantly check my spam and junk folders to ensure I'm getting the emails I subscribe to.
To view in browser along with past emails, click here. We respect your email privacy. |
|
|